This section describes how to setup Downloader Pro to download images from a card reader if you have Windows 98, Windows ME or Windows 2000.
| 1. | Plug-in your card reader to your PC if it isn't already connected and then insert a memory card containing some images. |
| 2. | Run Downloader Pro by double clicking on the desktop icon: |
![]()
| 3. | Click on the File menu and select Preferences. Then click on the General tab to display the dialog below: |
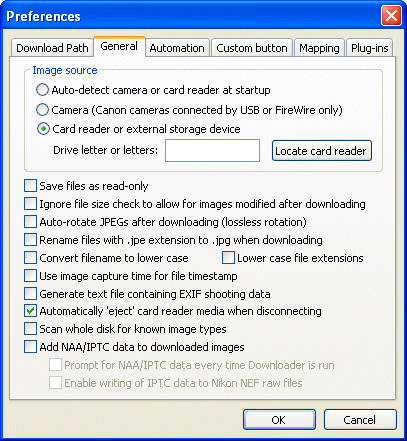
| 4. | Click on the "Locate card reader" button and Downloader Pro should automatically locate the card reader and enter its drive letter in text box. |
| 5. | Press the OK button and Downloader Pro will list the contents of the memory card: |
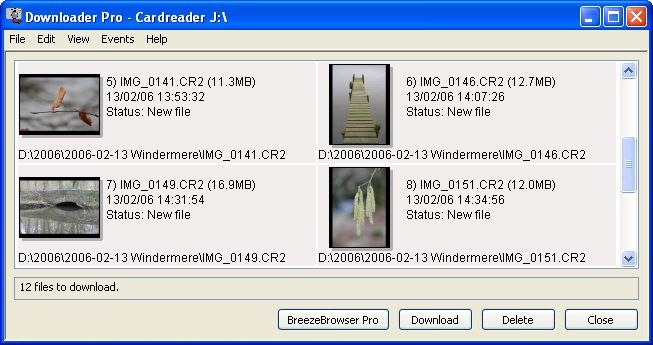
| 6. | Click on the Download button to start downloading the images. The images will be copied to the directory shown in the "Download path" column (D:\2006-02-13\Windermere for photos taken on 13th February 2006 in the example above). |
The download progress dialog will be displayed:

7. Click on the Close button to dismiss the download progress dialog when the download has finished. Your images are now on your PC's hard disk and ready for editing or viewing. Now either click on Delete button to delete the images from the memory card or the Close button to exit Downloader Pro.
Note: If Downloader Pro is unable to locate the drive letter for the card reader in step 4 above you can enter it manually. To do this first identify the drive letter assigned to your card reader using Windows Explorer. Then enter the drive letter in the General preferences dialog box.
Further information
To find out more about specifying which directory and filename photos are stored under see Using filename and directory tokens.
The section on "Making the most of Downloader Pro" contains useful hints and tips on setting up Downloader Pro.