This example shows how to set up the MDB Payment utility to pay for prints using Breeze Kiosk with a credit card reader in selection first/always idle mode.
In this example when the user selects print in Breeze Kiosk it displays the print payment screen and sends a payment request to the card reader which displays the amount and invites the user to make a payment. When the payment is authorized a "Payment accepted" command is sent to Breeze Kiosk telling it to print the photos.
Prerequisites
To use the MDB Payment utility you need to be running Breeze Kiosk v2.1 or later.
First check that the credit card reader is running in MDB level 3 for selection first/always idle mode. If the Nayax VPOS Touch is not set to MDB level 3 you may need to contact Nayax support to request them to set it to MDB level 3.
Check that Breeze Kiosk 2.1 or later is installed on the computer. Then In Breeze Kiosk enable the print option and click on "Print settings..." to enable print payment mode. Check the "Print screen timeout" is set to 90 secs to ensure the payment screen doesn't timeout before the user has time to make their payment.
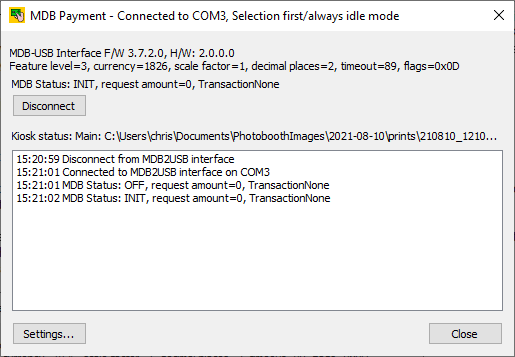
Run the MDB Payment utility on the same PC as Breeze Kiosk. The MDB Payment utility screen should look something like this:
Step 1: Add an event to enable the card reader
Click on the "Settings..." button to display the settings dialog:
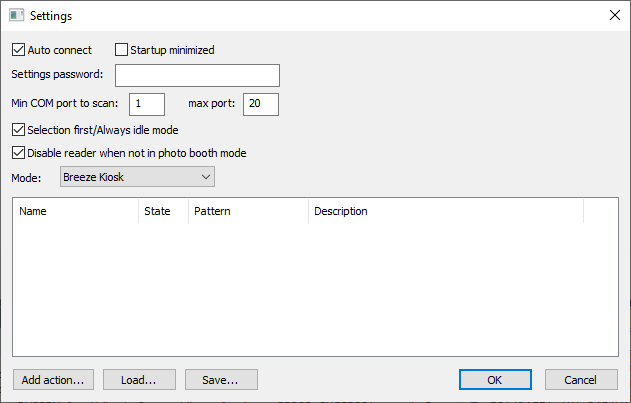
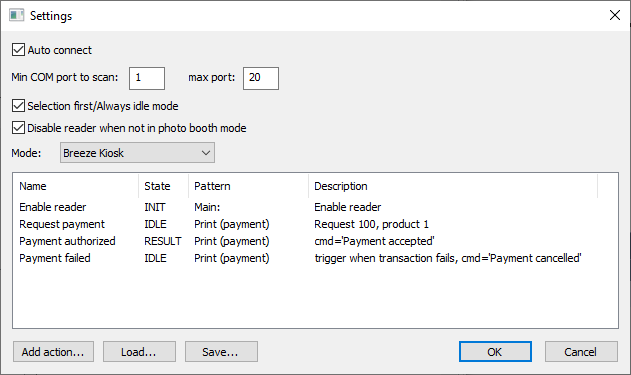
Check that "Selection first/Always idle mode" is selected and the "Mode:" dropdown list is set to "Breeze Kiosk".
Then click on the "Add action..." button to add an action:
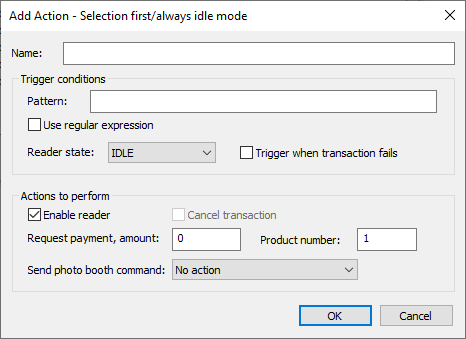
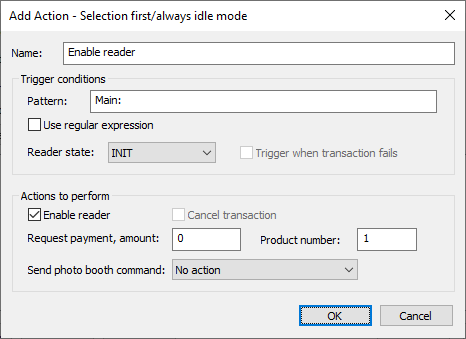
Give the action a suitable name e.g. "Enable reader" and then set the trigger conditions in the section below. What we want to do is enable the card reader when the Breeze Kiosk is displaying the main screen and the card reader is disabled.
The "Pattern" trigger condition is set to a pattern that matches the kiosk's state e.g. "Main:" or "Print (payment)". If "Use regular expression" is not selected the pattern string will match any part of the kiosk status string.
We only want to enable the card reader if it is disabled (i.e. the state is INIT) and so we set the reader state in the trigger conditions to INIT.
Next we need to specify the action to take when the trigger conditions are met. In this case all we need to do is enable the card reader.
The "Add action" dialog should look something like this:
Step 2: Request a payment when the user selects print
When the user taps print icon in Breeze Kiosk it will switch from the main screen to the to the print payment screen. When this happens we want to request a payment before printing. To do this click on "Add action..." in the settings dialog and name the action "Request payment". In the trigger conditions section set the pattern to "Print (payment)" and the reader state to IDLE.
In the actions to perform section set the "Request payment, amount:" to the amount, e.g. for $1 set this to 100, and set the required product number. The product number can be set to anything and is recorded in the logs that can be accessed via the Nayax web dashboard. This can be useful if you have different options at different prices and want to keep a record of which is selected.
Note: the amount is in cents for USD or Euros and pence for GBP. This is because the scale factor is 1 and the decimal places is 2 in the MDB status shown in the main screen.
The "Add action" dialog should look something like this:
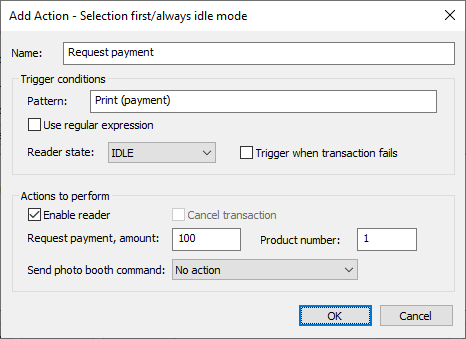
When the payment has been requested the status changes to VEND. If the payment is authorized the status will change to RESULT but if it fails it will change to IDLE with the status TransactionFailed.
Step 3: Payment Authorized
Define a new action named "Payment authorized" that is triggered when the Breeze Kiosk is displaying the print payment screen and the reader state is RESULT. In the actions to perform section set the photo booth command to "Payment accepted".
The "Add action" dialog should look something like this:
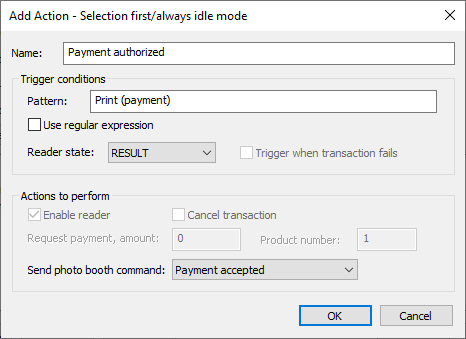
Note: defining an action that is triggered by the RESULT state automatically sends a confirmation message to the reader which will display a "Thank you" screen and then switch to the IDLE state.
Step 4: Payment Failed
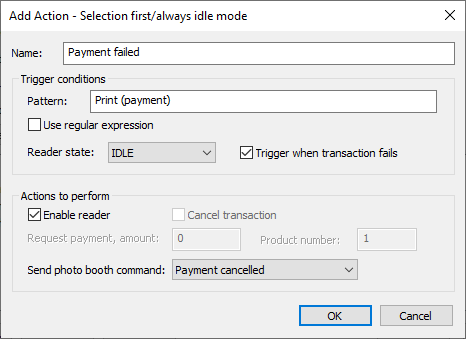
If the payment is not authorized, times out or is cancelled by the user the state changes to IDLE with the status TransactionFailed. When this happens we want to close the print payment screen and return to the main screen without printing the photos.
Define a new action named "Payment failed" that is triggered when the photo booth is displaying the print payment screen, the reader state is IDLE and the transaction fails. In the actions to perform section set the photo booth command to "Payment cancelled".
The "Add action" dialog should look something like this:
The settings screen should show all four actions and look something like this:
Check it works
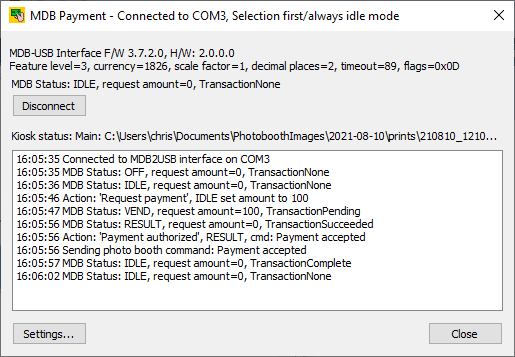
Click "OK" in the settings screen to return to the main screen. Tap the print icon in Breeze Kiosk to display the print payment screen and the card reader should request a payment. Then scan a credit card (or the Nayax technician mode card) to start a payment. The Breeze Kiosk should wait for the payment to be authorized and then start printing. After printing Breeze Kiosk will display the main screen again.
The main screen should look something like this:
Refinements
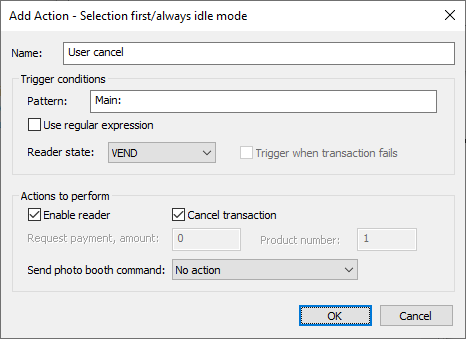
The user can cancel the payment by tapping the cancel button in the print payment screen in Breeze Kiosk. This will close the print payment screen and return to the main screen ready for the print request but the card reader will still be showing the payment screen. To cancel the payment on the card reader we need to add an action that is triggered when the main screen is displayed and the card reader is in the VEND state. This action should send a cancel command to the card reader. The action would look something like this:
The actions used in this example can be loaded by clicking on the "Load..." button and loading the MDB_kiosk_selection_first_ex1.xml settings file.