The Bluetooth option in Breeze Booth makes it possible to connect to compatible Bluetooth peripherals and interface with hardware such as lights, LED strips and payment systems.
To connect Breeze Booth to a compatible Bluetooth LE device go to the settings screen, select "Show advanced settings" and select "Connect to Bluetooth":
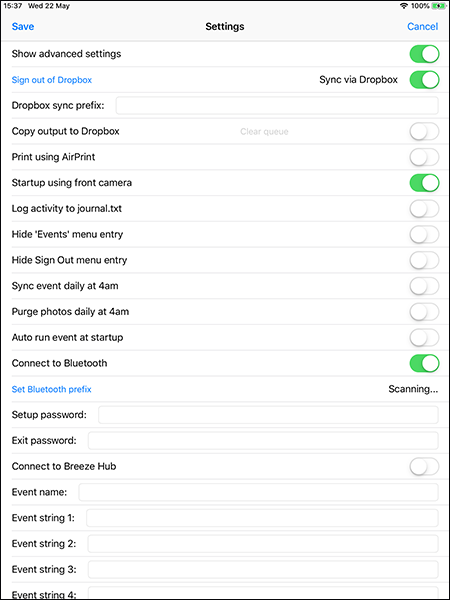
The line below "Connect to Bluetooth" will show the connection status:
"Scanning..." - if it can't find any compatible Bluetooth peripherals
"Connected to: <id>" - if it is connected the a Bluetooth peripherla with id "<id>"
or a display of the ids of compatible Bluetooth devices which don't match the prefix defined in Breeze Booth
Tap "Set Bluetooth prefix" to define which Bluetooth ids the app will connect to. For example, if you have a compatible Bluetooth peripheral to control LED lights which has an id of "Breeze_LED_3c03056712" you could set the Bluetooth prefix to "Breeze_LED". If you have multiple iPad photo booths each with an LED light controller you need to enter the full id as the prefix to ensure that each booth connects to the correct LED controller e.g. set the prefix to "Breeze_LED_3c03056712".
Sending Commands to a Connected Bluetooth Device
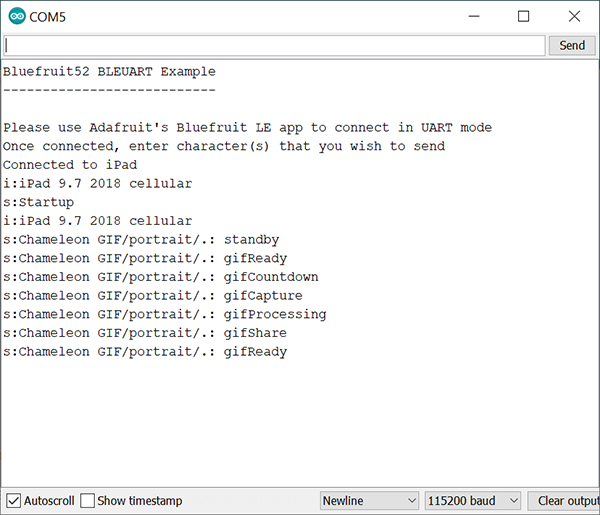
When an event is running the app sends information to a connected Bluetooth device each time a screen is displayed e.g. when the ready screen is displayed it sends a string similar to:
s:cameleon/portrait/.: stillsReady
The app can also send a command string which can be defined for each screen for an event. This option is for advanced users and system integrators who are developing their own Bluetooth devices to connect to the iPad app.
Click on the "Bluetooth commands..." button in the "General" tab of the event editor to display the "Bluetooth Commands" dialog:
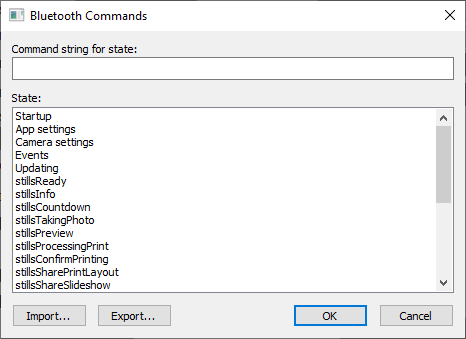
To enter a string to be sent first select the iPad state, e.g. stillsReady, and then enter the command string for that state. When the event is run the command string will be sent to a connected Bluetooth device when the photo booth switches to the given state.
Technical Details
Breeze Booth can connect to Bluetooth peripherals that provide the Nordic UART service. This allows the app to send messages to the peripheral and the peripheral to send commands to the app. Each time the screen changes in the app it sends a status message to the Bluetooth peripheral with details of the screen being displayed. The peripheral can send commands to the app to query its status (e.g. battery level, memory usage, screen info) as well as commands to control the app e.g. stillsStart to start the shooting sequence when the app is displaying the stills ready screen.
The commands the peripheral can send to the app are:
?d - query the model name, example response: d:iPad 9.7" 2018
?i - device name, example response: i:My iPad
?s - status, returns the current screen, example response: s:cameleon/portrait/.: stillsReady
?v - vendor id, returns the vendor id (as displayed at the bottom of the settings screen). Example response: v:5A3B4974-C0AC-44BD-8CFA-8635367E0FC3
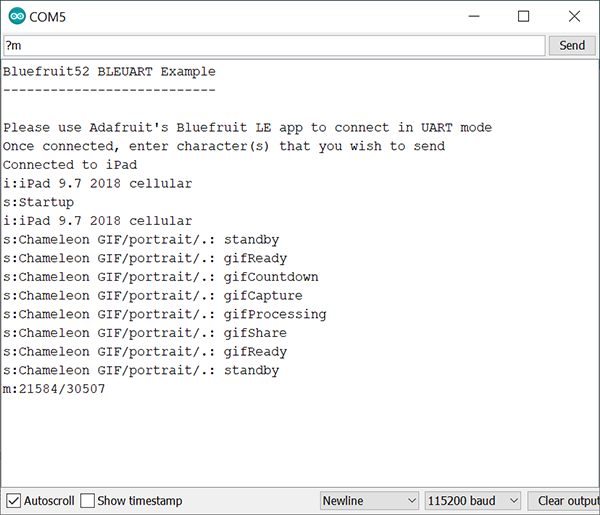
?m - memory usage, returns the number of MB free and total memory in MB, example response m:21742/30507
?b - battery percentage, returns the percentage charge remaining in the battery and the charging state (unplugged, charging, full or unknown), example response b:98,unplugged
?t - device date and time in the format YYYYMMDD_hhmmss
?<token> - query the value of one or more tokens. Example response to ?{date} is ?{date}=2022-06-30
start - enter photo booth mode from the startup screen
!msg - display msg in the start screen in the login status area located below the start button. Messages can be displayed in two lines by using the sequence \n e.g. !first line of message\nsecond line
<touchscreen action> - the name of any touchscreen action when in photo booth mode
Sending commands to the iPad
Commands can be sent to the iPad to control its operation by sending the name of the touchscreen action e.g. to switch to stills mode and start the countdown send "switchToStillsAndStart" followed by a new line character.
Sending text strings to the iPad
Up to 10 strings can be sent to the iPad app app using the @bt<n>: command. This is useful if the Bluetooth device is connected to a scanner (e.g. an RFID reader) that reads information that needs to be passed to the iPad. The strings can be accessed using the tokens {bt1}, {bt2}, {bt3} etc.
Examples:
@bt1:My name - sets Bluetooth string #1 to "My name". This can be accessed by the app using the token {bt1}
@bt2:sales@breezesys.com - sets Bluetooth string #2 to "sales@breezesys.com". This can be accessed by the app using the token {bt2}
@bt3:more info - sets Bluetooth string #3 to "more info". This can be accessed by the app using the token {bt3}
...
@bt10:string 10 - sets Bluetooth string #10 to "string 10". This can be accessed by the app using the token {bt10}
Bluetooth Devices
It is relatively easy to program a microcontroller to control LED strips or read sensors and communicate with Breeze Booth for iPad via Bluetooth. The simplest way to do this is to program a microcontroller board using CircuitPython (a version of the Python programming language that has been designed to run on low cost microcontroller boards). Suitable microcontrollers are the Adafruit Feather nRF52840 Express or the Adafruit ItsyBitsy nRF52840 Express - Bluetooth LE. The Adafruit ItsyBitsy nRF52840 Express - Bluetooth LE is a low cost option which has the advantage that it is easier to interface to LED strips (e.g. NeoPixels) because it has a 5V logic output.

Adafruit Feather nRF52840 Express
Programming Bluetooth microcontroller boards using CircuitPython
We recommend using the Adafruit ItsyBitsy nRF52840 Express - Bluetooth LE as this is a low cost microcontroller with Bluetooth LE support and a 5V digital output pin suitable for interfacing to LED strips such as NeoPixels.
First set up the board for running CircuitPython and install the Mu editor by following this guide by Adafruit: CircuitPython for ItsyBitsy nRF52840 Express
After setting up the board to run CircuitPython it will appear as a drive called "CircuitPython" when connected to a computer via USB. CircuitPython programs can be run on the board simply by editing the code.py file on the drive directly or by dragging and dropping a code.py file onto the drive.
Example 1: Simple Bluetooth connection
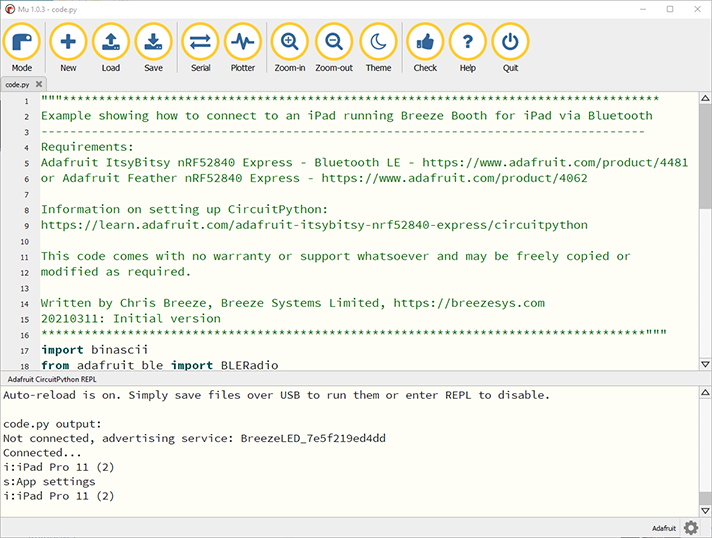
This example shows how to set up the microcontroller as a Bluetooth peripheral which can connect to an iPad running Breeze Booth for iPad.
Hardware requirements: Adafruit ItsyBitsy nRF52840 Express - Bluetooth LE
The example can be downloaded from https://breezesys.com/downloads/CircuitPython_BLE.zip
Unzip the file after downloading and copy its contents to the CircuitPython drive. Run the Mu editor and click on the load button to load code.py then click on the serial button to display the output from the board. Connect the iPad by going to Breeze Booth for iPad's App Settings screen and setting the Bluetooth prefix to Breeze and enabling "Connect to Bluetooth". After establishing the Bluetooth connection status messages sent by the iPad will be displayed in the MU editor:
Example 2: Controlling NeoPixel LED strips
This example shows how to set up the microcontroller as a Bluetooth peripheral which can connect to an iPad running Breeze Booth for iPad and can control LED NeoPixel strips.
Hardware requirements: Adafruit ItsyBitsy nRF52840 Express - Bluetooth LE and RGB+W NeoPixel strip or SK6812 RGB+W LED strip
Important: IPlease see Adafruit's tutorials for information on powering LED strips before connecting the LEDs to the microcontroller otherwise you risk damaging the microcontroller board: https://learn.adafruit.com/adafruit-neopixel-uberguide
The example code is set up for 144 pixels at low power and should be able to power the NeoPixels directly from the USB pin on the microcontroller without damaging it. You will need to use an additional power connection to provide enough current to drive the LEDs at full power.
Connect the NeoPixels to the Adafruit ItsyBitsy nRF52840 Express - Bluetooth LE (see this guide for details: https://learn.adafruit.com/adafruit-itsybitsy-nrf52840-express/circuitpython-neopixel).
The example can be downloaded from https://breezesys.com/downloads/CircuitPython_NeoPixel_BLE.zip
Unzip the file after downloading and copy its contents to the CircuitPython drive. Run the Mu editor and click on the load button to load code.py.
Connect the iPad by going to Breeze Booth for iPad's App Settings screen and setting the Bluetooth prefix to Breeze and enabling "Connect to Bluetooth". After establishing the Bluetooth connection the LEDs should change to a different color or animation for each screen displayed on the iPad.
Use the Mu editor to edit the code.py file to change the number of pixels, the brightness and the animations for each screen (these are set in a series of if...elif... statements towards the end of the file).
Programming Arduino based Bluetooth microcontroller boards
First setup the Arduino development environment by following the steps in Adafruit's tutorial
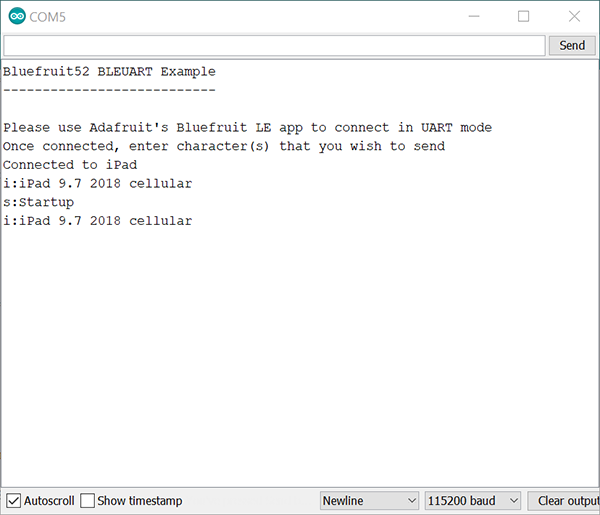
Then load the bleart example by selecting File->Examples->Adafruit Bluefruit nRF52 Libraries->Peripheral->bleuart in the Arduino IDE. Upload the example to the Adafruit Feather board and open the serial monitor in the Arduino IDE (Tools->Serial monitor) and you should see something like this:
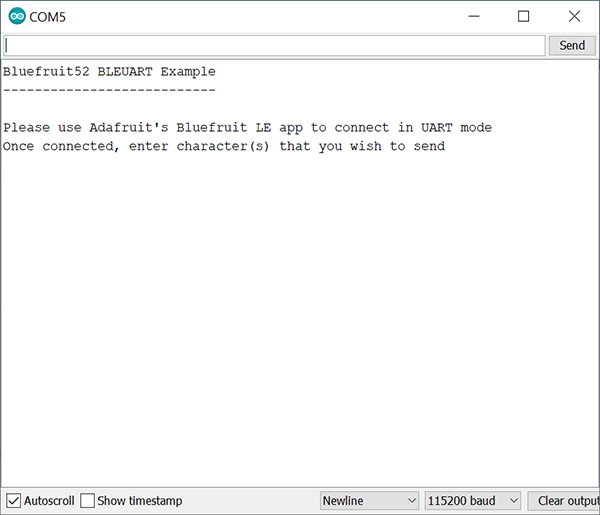
In the Breeze Booth settings screen the "Set Bluetooth prefix" line should show "Scanning: Bluefruit52". This shows that it has found a compatible Bluetooth peripheral but isn't connecting to it because its id doesn't match the prefix defined in Breeze Booth. Tap on "Set Bluetooth prefix" and set the prefix to "Bluefruit52", tap OK and it should connect to the peripheral and display "Connected to: Bluefruit52" in the settings screen. The serial monitor in the Arduino IDE should now show some information from the app:
Run an event in Breeze Booth and each time the screen changes a screen status message is sent to the Bluetooth peripheral and is displayed in the Arduino IDE's serial monitor e.g.
If you are familiar with controlling LED strips from an Arduino (e.g. Adafruit NeoPixel) you could modify the bleuart example to read the screen status messages from the iPad and display different LED light patterns depending on the screen being displayed. If you are not familiar with LED strips there are some excellent tutorials on the Adafruit website
![]()
Breeze Booth controlling an LED strip via Bluetooth
Commands can be sent to the iPad by typing into the text field at the top of the serial monitor window and pressing send e.g. to query the iPad's memory usage enter ?m
It is also possible to control the iPad in photo booth mode by sending the name of the touchscreen action to be performed e.g. enter "stillsStart" to start the photo booth shooting sequence when the stills ready screen is displayed.
The bleuart example can be modified to control the booth e.g.
- detect a button press to start the shooting sequence
- use a proximity sensor to detect guests standing close to the booth and send a command to switch from the standby screen to the ready screen
- interface to a payment system and switch to the ready screen when a payment has been accepted.
A sample Arduino sketch for an Adafruit Feather nRF52840 Express or Adafruit Feather nRF52 Bluefruit LE can be download from here: Breeze_Booth_LED_strips.zip
Please note: This sample Arduino sketch comes with no warranty or support and requires some working knowledge of programming Arduino microcontrollers.