Roaming photography is where a photographer engages with guests at an event and takes their photos and shares them on the spot. Breeze Booth for iPad is ideal for this type of event photography because it provides a compact all-in-one solution when run on an iPhone and paired with a high quality Canon camera. The photographer retains full control over the camera and when they take a photo it is instantly displayed on the phone ready for sharing. The photographer is free to take horizontal or vertical photos, whichever gives the best composition, and the photos presented for sharing can be branded using overlays and logos and use all the tools available in print layouts.
Setup
Firstly you need a Canon camera with a suitable lens. If the lighting at the venue is poor you may also need a flashgun and diffuser. The choice of camera, lens and lighting is beyond the scope of this help file. Please see this section for a list of supported camera models.
Next you need an iPhone or iPad on which to run Breeze Booth for iPad. Ideally you want a compact device that can be mounted with the camera such as an iPhone SE.
You also need a cable to connect the camera to the iPhone or iPad. If you're using an iPhone you need a lightning to USB C cable (if using a recent Canon camera) or a lightning to USB mini B cable (if using a Canon DSLR).
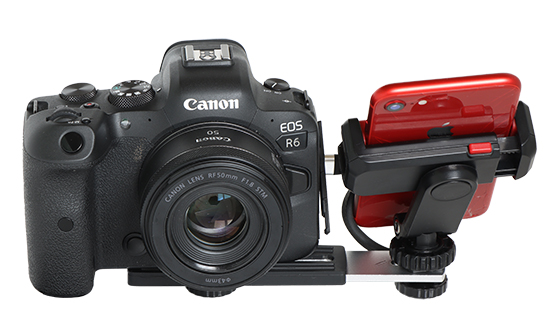
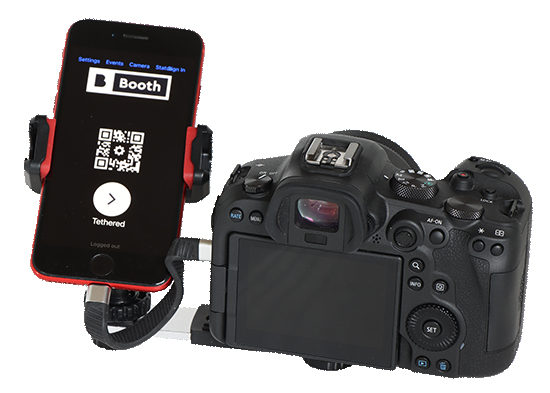
A simple setup using a Canon EOS R6 with 50mm f1.8 lens and an iPhone SE is shown below. This setup can produce professional quality photos using a compact and lightweight rig.


Please see the section on using an external camera for information on how to connect the camera. Make sure "Photographer mode" is selected in the camera settings window. This will allow the photographer to adjust the exposure settings using the camera controls instead of the app. If the live view display from the camera is not the right way up tap the "Rotate live view" button to rotate it.
How it works
Normally a photo booth works by having a start button and a 3, 2, 1... style countdown before taking the photo. When an external camera is used with Breeze Booth for iPad the photographer can take a photo instantly by pressing the shutter button on the camera. The normal countdown is skipped and the photo is downloaded and displayed in the app ready for sharing almost instantly.
The event can be set up in a number of different ways to suit the shooting style for the event:
| 1. | For taking one or more photos and then viewing them in a gallery for sharing. To do this disable the preview after each photo, disable the print confirmation, disable sharing by text or email and enable the gallery. |
| 2. | For sharing on the spot you want it to go straight to the sharing screen. To do this disable the preview after each photo, disable the print confirmation screen and enable sharing by text or email. |
| 3. | For sharing on the spot with the option to accept or reject the photos. To do this use similar settings to #1 but enable the preview after each photo or the print confirmation screen to give guests or the photographer the option to accept or reject the photo. |
| 4. | For photos to be displayed in an online gallery. To do this disable the preview after each photo, disable the print confirmation screen and disable the sharing options so that the app quickly returns to the ready screen ready for the next shot. Use Breeze Hub, syncing to Dropbox or the uploader to transfer the photos to the gallery. |
| 5. | For photos to be displayed in a gallery with the option to accept or reject the photos. To do this use similar settings to #3 but enable the preview after each photo or the print confirmation screen to give guests or the photographer the option to accept or reject the photo. |
You can also add a gallery to the event so that guests can look through previous photos and share them by email or text.
Shooting Landscape and Portrait Images
Photos can be taken in either landscape or portrait orientation and different print layout can be used for each. This allows a roaming photographer to frame a photo vertically (e.g. for individual guests or couples) or horizontally (e.g. for headshots or larger groups).
To enable the automatic selection of the print layout using the camera orientation create an event with profiles for both landscape and portrait orientations. Design the print layout for the landscape profile to print landscape orientation photos and the print layout for the portrait layout to print portrait photos. Then in the camera settings select "Photographer mode" and enable the orientation lock on the iPad or iPhone.
When a photo is to be printed the app will use the orientation information stored in the EXIF shooting data to determine whether it was shot in landscape or portrait orientation. If it was shot in landscape orientation it will use the print layout from the landscape profile. If the photo was shot in portrait orientation it will use the print layout from the portrait profile.
Adapting existing events
Any normal photo event can be used for roaming photography with little or no modification. The easiest events to use are ones with a single photo where the iPhone/iPad orientation is the same as the camera e.g. landscape orientation iPhone or iPad and camera in landscape orientation. If the iPhone/iPad orientation differs from the camera, e.g. portrait orientation iPhone or iPad and camera in landscape orientation, the print layout will need to be edited to display the photos without cropping.
Supporting multiple photos in one print layout
Taking a photo when the ready screen is displayed automatically skips the countdown. When an event has more than one photo it will display the countdown for the second photo after the first was has been taken. With roaming photography we want to disable the countdown and have the app wait until the photographer takes the next photo or they choose to abandon the set of photos.
The countdown can be disabled be doing the following:
| 1. | Check the screens folder and remove any GIF, MP4 or MOV animations for countdowns e.g. countdown.mov or GIF or video files starting with 1, 2, 3 or 4. |
| 2. | In the Photo Settings tab set the "Countdown remaining photos (secs)" to 600 seconds so that the app waits up to 5 minutes for the photographer to take the next photo. |
| 3. | Either set the countdown text to an empty string or edit it to provide a message to the photographer e.g. "Take photo {photoboothImage} of {photoboothNumImages}" |
To allow the photographer to abandon a set of images create an overlay screen for the countdown e.g. 2.png and edit this to include the graphics for a cancel button. Then use the touchscreen editor to add a "cancelCountdown" touchscreen action.
Sample event
The roaming sample events are designed for taking photos in landscape or portrait orientation and are designed to run on a small iPhone (e.g. iPhone SE) connected directly to a Canon camera. The phone can be fixed to the camera in either portrait or landscape orientation. For best results enable the orientation lock on the phone.
There are two versions of the roaming event:
| • | roaming (mirrorless) - use this event if you have a mirrorless camera such as the Canon EOS R6, Canon EOS R100 or Canon EOS M50 Mark II |
| • | roaming (DSLR) - use this event if you have DSLR camera such as the Canon Rebel T8i/EOS 850D, Canon Rebel T7/EOS 2000D or Canon Rebel T6/EOS 1300D |
The only difference between the two events is live view is enabled for the mirrorless version and disabled for the DSLR version. This is because a mirrorless camera can display live view images and use the viewfinder for composing images whereas the viewfinder is blanked when live view is enabled on a DSLR camera.
The sample roaming events can be downloaded to your iPhone or iPad by scanning this QR code:

A zip file containing these example events can be downloaded to your PC and loaded into the event editor from: https://bb4ipad.com/sync/roaming.zip