Breeze Booth for iPad can use a Canon camera instead of the iPad's built-in camera. This gives better image quality when taking photos and allows the use of flash for better lighting. The external camera can be used to take photos and to capture boomerang GIFs and videos. Please note that the camera needs a memory card if it is to be used for video capture.
The external camera can be any recent Canon EOS camera or PowerShot camera (full list of supported cameras).
The Canon EOS M50 and Canon EOS R10 are good options because they are compact and have Canon's excellent dual pixel AF with face detect in live view.
How it works
Breeze Booth for iPad connects directly to a Canon camera via a USB connection.
If you are using an iPad which has a USB C connection you can use a USB C hub and connect the camera using a USB cable plugged into the USB hub. It's best to use a USB C hub that has a USB C charging port so that you can charge the iPad when using an external camera.
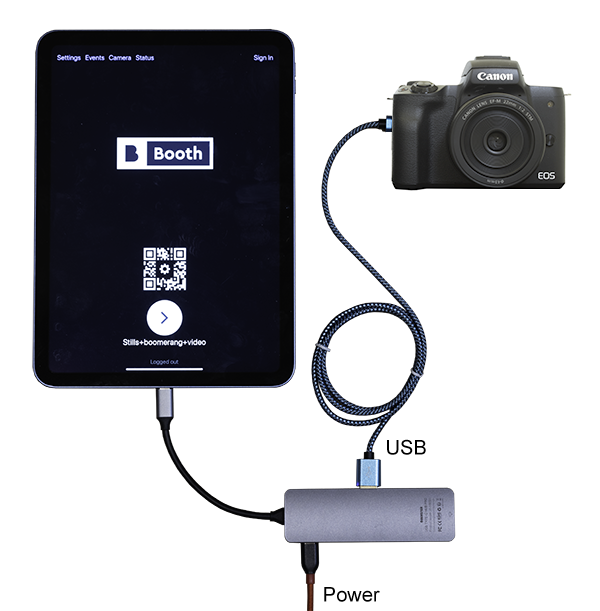
If you are using a recent Canon camera with USB C you can connect it directly to an iPad with a USB C connection. This is convenient when testing but isn't recommended for prolonged use because it isn't possible to charge the iPad when a camera is connected directly to its USB C connection.
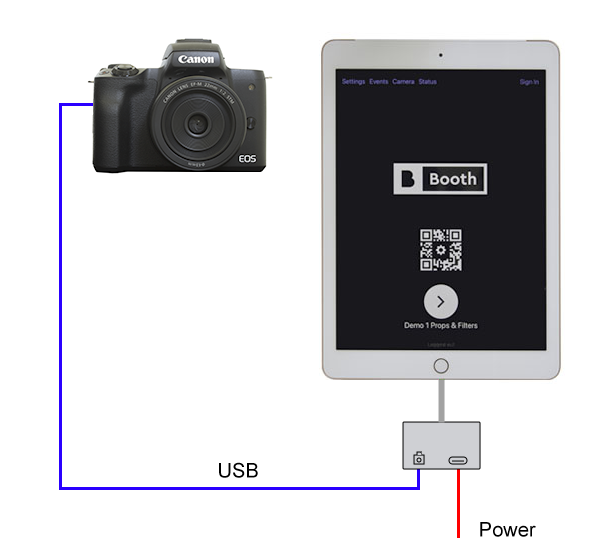
If you are using an iPad which has a lightning connector you will need a lightning to USB adapter. It's best to use a lightning to USB adapter that also has a lightning charging port so that you can charge the iPad when using an external camera.
To enable a connection to an external camera click on "Camera Settings" at the top of the start screen in Breeze Booth for iPad and then select external camera:
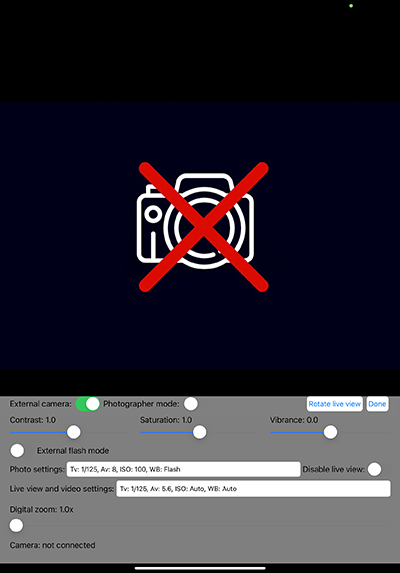
The camera settings screen will display a graphic showing a camera with a red X if it is not connected to a camera.
Connect the camera to the iPad and turn the camera on. After a few seconds the graphic showing a camera with a red X will be replaced with live view images from the camera. Please note that it may take several seconds to connect to the camera if it has a memory card full of images.
The screenshot below shows the iPad connected to a Canon EOS M50 camera with live view images being displayed from the connected camera:
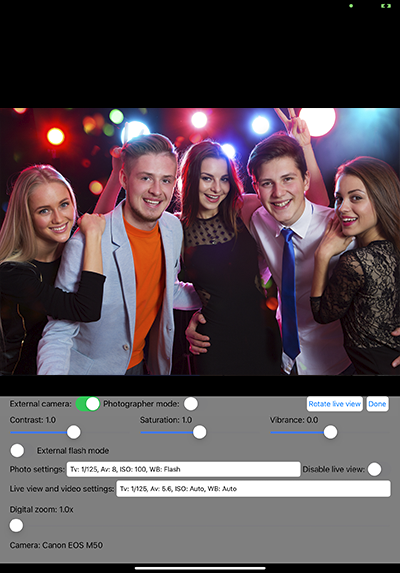
The status line at the bottom of the window shows the camera model.
Camera Settings
Tap the "Rotate live view" button to rotate the live view images from the external camera if they are not the right way up. The live view is rotated 90 degrees each time the "Rotate live view" button is pressed. The camera orientation does not need to be the same as the iPad e.g. the camera can be in landscape orientation with the iPad in portrait orientation or any other combination.
Select "Photographer mode" for roaming photography where a photographer takes the photos and adjusts the exposure settings using the camera's controls. For a fixed photo booth disable photographer mode so that the app can adjust the camera settings.
The optimum camera settings depend upon the type of lighting and the camera model. Set the exposure mode dial to M and the image quality to JPEG not raw or HDR/HEIF. The medium/fine JPEG setting should give good results and will be slightly faster than the large JPEG settings due to smaller file sizes.
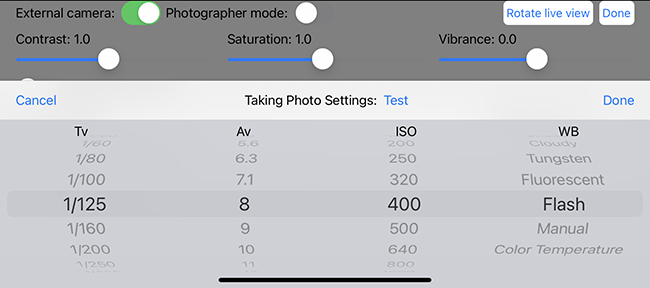
The "Photo settings" displays the camera settings that are used when taking photos. Tap on these settings to adjust them and tap the "Test" button to take a test photo:
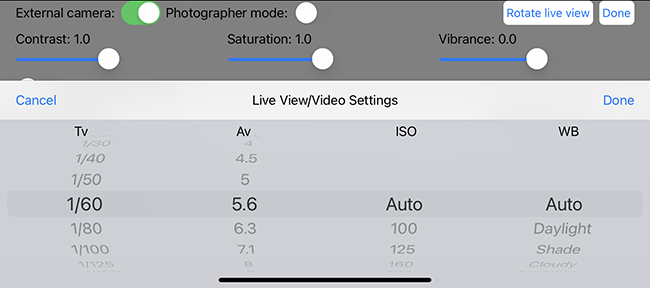
The "Live view and video settings" displays the settings that are used when displaying live view images and when capturing videos. Tap on these settings to adjust them:
The suggested settings for a number common set ups are listed below:
1) Mirrorless cameras (e.g. Canon EOS M50 or Canon EOS R10)
Taking photos with a studio strobe/flash connected via the camera's hotshoe:
Tap on the photo settings and set the shutter speed (Tv) to 1/125 sec, aperture (Av) to 8, ISO to 400 and white balance (WB) to flash. Tap the test button to take a test photo to check the exposure settings. If the exposure is too light or too dark adjust the power of the flash or the camera's ISO setting.
Tap on the live view and video settings and set the shutter speed to 1/60 sec, aperture to 5.6, ISO to auto and white balance to auto. If the live view display is too dark select a faster shutter speed or smaller aperture. If the live view is too bright select a faster shutter speed or a smaller aperture. Alternatively disable exposure simulation in the camera settings (this setting is not recommended if you are also capturing videos).
Capturing videos:
Tap on the live view and video settings and set the shutter speed to 1/60 sec, aperture to 5.6, ISO to auto and white balance to auto. Adjust the shutter speed and aperture to get the correct exposure.
Check that exposure simulation is enabled in the camera so that the live view images show the current exposure settings.
Note: When capturing videos at standard frame rates (between 24fps and 30fps) the shutter speed should be 1/30 sec or faster. When capturing slow motion video using the camera's 120fps high frame rate setting set the shutter speed to 1/125 or faster.
2) Canon Rebel series DSLR cameras (e.g. Rebel T6/EOS 1300D or Rebel T7/EOS 2000D)
These settings apply to any camera which does not have a B setting on the exposure mode dial. This includes most Rebel series DSLR cameras.
Taking photos with a studio strobe/flash connected via the camera's hotshoe:
Select the "External flash mode" setting. When "External flash mode" is selected the only settings you can change are the aperture and the ISO. The shutter speed does not affect exposure when using flash and is set to 1/125 sec. The white balance is set to "Flash" to give good colors with flash. When live view is active the app automatically sets the shutter speed to bulb and the white balance to auto. Setting the shutter speed to bulb cause the camera to use auto exposure for the live view to give bright live view images. Setting the white balance to auto should give good colors in live view as the lighting will be different from when the photo is taken using flash.
Take some test shots with flash by tapping the "Test" button and adjust the flash power and the camera aperture and ISO to get the correct exposure.
Capturing videos:
Disable the "External flash mode" setting and tap on the live view and video settings and set the shutter speed to 1/60 sec, aperture to 5.6, ISO to auto and white balance to auto. Adjust the shutter speed and aperture to get the correct exposure.
Check that exposure simulation is enabled in the camera so that the live view images show the current exposure settings.
Note: When capturing videos at standard frame rates (between 24fps and 30fps) the shutter speed should be 1/30 sec or faster. When capturing slow motion video using the camera's 120fps high frame rate setting set the shutter speed to 1/125 or faster.
Taking photos and capturing videos in the same event:
If you have an event which gives guests the choice of taking photos or capturing videos you need to disable "External flash mode" and select "Disable live view". Then adjust the photo settings and live view/video settings manually. The "Disable live view" setting disables live view just before taking each photo. This is required because the camera won't trigger the flash when taking a photo with live view active.
Tap on the photo settings and set the shutter speed (Tv) to 1/125 sec, aperture (Av) to 8, ISO to 400 and white balance (WB) to flash. Tap the test button to take a test photo to check the exposure settings. If the exposure is too light or too dark adjust the power of the flash or the camera's ISO setting.
Tap on the live view and video settings and set the shutter speed to 1/60 sec, aperture to 5.6, ISO to auto and white balance to auto. If the live view display is too dark select a faster shutter speed or smaller aperture. If the live view is too bright select a faster shutter speed or a smaller aperture. Alternatively disable exposure simulation in the camera settings (this setting is not recommended if you are also capturing videos).
Note: When capturing videos at standard frame rates (between 24fps and 30fps) the shutter speed should be 1/30 sec or faster. When capturing slow motion video using the camera's 120fps high frame rate setting set the shutter speed to 1/125 or faster.
3) Mid range and high end Canon DSLRs (e.g. Canon EOS 90D)
Mid range and higher end Canon DSLRs have a B setting on the exposure mode dial to select bulb exposure. This means that the "External flash mode" setting can't be used and separate camera settings need to be selected for taking photos and for live view display.
Set the camera exposure mode dial to M and switch off "External flash mode" in the camera settings screen.
For easy setup it is suggested that live view exposure mode simulation is disabled in the camera's settings. When this is disabled the camera will use auto exposure for live view and you don't need to set the shutter speed, aperture and ISO for the live view settings.
You also need to disable live view silent shooting mode in the camera settings when using a Canon DSLR otherwise the flash won't fire when taking photos. Alternatively you can select the "Disable live view" in the camera settings screen. The "Disable live view" will disable live view immediately before taking a photo.
Tap on the photo settings to adjust the camera settings when taking photos. If you are using flash you need to set the shutter speed fast enough to cut out the ambient lighting and no faster than the camera's flash sync speed. Setting it to 1/125 sec should work with any camera and flash. Set the white balance to match the color of the flash (normally the "Flash" setting will give good results).
Take some test shots with flash and adjust the flash power and the camera aperture and ISO to get the correct exposure. You can do this by tapping on the photo settings to display the camera settings for taking photos and then tap on the "Test" button.
The "Disable live view" setting to the right of the photo settings controls whether live view is disabled before taking a photo. This can be useful when using low end Canon DSLRs which don't have dual pixel AF in live view. When live is disabled before taking the photo the DSLRs normal AF system can be used to focus before taking the photo. You don't need to select the "Disable live view" setting if you are using a mirrorless camera or a DSLR camera that supports dual pixel continuous face detect AF in live view.
Tap on the live view settings to adjust the camera settings used when live view is displayed. You don't need to adjust the shutter speed, aperture and ISO settings if live view exposure simulation is disabled in the camera. All you need to adjust is the white balance setting to match the color temperature of the ambient lighting. In most cases setting the white balance to Auto will give good results.
If live view exposure simulation is enabled in the camera you need to adjust the shutter speed, aperture and ISO settings to get correctly exposed live view images. Setting the ISO to Auto will give auto exposure of the live view images.
4) Continuous lighting with any camera
If you are using continuous lighting (e.g. LED lighting) you need to use the same settings for taking photos and for live view. To do this make sure "External flash mode" is not selected in the camera settings screen.
For complete control over the exposure the camera should be set to manual exposure by setting the exposure mode dial to M. Then tap on the "Live view settings" and adjust the shutter speed, aperture and ISO to give the correct exposure. Then set the white balance to match the color temperature of the lighting.
Then set the "Photo settings" to the same settings as the "Live view settings" because the same lighting is used for both live view and for taking the photos.
If you prefer you can use one of the camera's auto exposure settings by setting the exposure mode dial on the camera to Auto, P, Tv or Av. When the exposure mode is set to Auto or P the camera selects the shutter speed and the aperture to give the correct exposure. Only the ISO and white balance settings in the camera settings will have any effect. Similarly when the exposure mode is set to Av *aperture priority) the camera selects a shutter speed to match the aperture and the shutter speed setting in the camera settings is ignored.
Please note: If the camera is set to autofocus and is unable to lock focus it will not be able to take a photo. The iPad will display the "AF error" screen for 10 seconds and then try again by restarting the countdown. It will try to take the photo up to three times before displaying an error message and returning to the ready screen. The "AF error" screens and animations are named af_error.jpg, af_error.png, af_error.gif, af_error.mov/mp4. If AF fails three times it will display the "AF abort" error using screens and animations named af_abort.jpg, af_abort.png, af_abort.gif, af_abort.mov/mp4
Please see the Screens displayed to the user section for details.
Canon EOS R3
Canon EOS R5
Canon EOS R6 Mark II
Canon EOS R6
Canon EOS R7
Canon EOS R8
Canon EOS R10
Canon EOS R50
Canon EOS R100
Canon EOS R
Canon EOS RP
Canon EOS-1DX Mark II
Canon EOS-1DC
Canon EOS-1DX
Canon EOS-1Ds Mark III
Canon EOS-1Ds Mark II
Canon EOS-1D Mark IV
Canon EOS-1D Mark III
Canon EOS 5DS R
Canon EOS 5DS
Canon EOS 5D Mark IV
Canon EOS 5D Mark III
Canon EOS 5D Mark II
Canon EOS 6D Mark II
Canon EOS 6D
Canon EOS 7D Mark II
Canon EOS 7D
Canon EOS 90D
Canon EOS 80D
Canon EOS 77D/EOS 9000D
Canon EOS 70D
Canon EOS 60D
Canon EOS 50D
Canon EOS 40D
Canon EOS 30D
Canon EOS 4000D/EOS 3000D/Rebel T100
Canon EOS 2000D/EOS 1500D/Rebel T7/Kiss X90
Canon EOS 1300D/Rebel T6/Kiss X80
Canon EOS 1200D/Rebel T5/Kiss X70
Canon EOS 1100D/Rebel T3/Kiss X50
Canon EOS 1000D/Rebel XS/Kiss F
Canon EOS 250D/Rebel SL3/Kiss X10/200D Mark II
Canon EOS 200D/Rebel SL2/Kiss X9
Canon EOS 100D/Rebel SL1/Kiss X7
Canon EOS 850D/Rebel T8i/Kiss X10i
Canon EOS 800D/Rebel T7i/Kiss X9i
Canon EOS 760D/Rebel T6s/EOS 8000D
Canon EOS 750D/Rebel T6i/Kiss X8i
Canon EOS 700D/Rebel T5i/Kiss X7i
Canon EOS 650D/Rebel T4i/Kiss X6i
Canon EOS 600D/Rebel T3i/Kiss X5
Canon EOS 550D/Rebel T2i/Kiss X4
Canon EOS 500D/Rebel T1i/Kiss X3
Canon EOS 450D/Rebel XSi/Kiss X2
Canon EOS 400D/Rebel XTi/Kiss X
Canon EOS M6 Mark II
Canon EOS M200
Canon EOS M50 Mark II/Kiss M2
Canon EOS M50/Kiss M
Canon PowerShot SX70 HS
Canon PowerShot G5 X Mark II
Canon PowerShot G7 X Mark III