Breeze Gallery Uploader is a tool to automatically upload photos, animated GIFs and MP4 movies from Breeze photo boot applications to online galleries. It can upload files using HTTPS POST to a website or an online gallery such as Photobooth Online Galerie (https://www.photobooth-deluxe.de/en/wordpress-photobooth-galerie-dokumentation/). Alternatively it can upload files directly to galleries in Hula Gallery (https://www.hula.co/apps/gallery).
The uploader monitors the output folder from the photo booth application and reads the XML summary file to obtain a list of files and associated meta data to upload. Internet usage is minimized by checking whether a file is already on the server before uploading the file. Files from a single session can be grouped so that they are displayed together in the online gallery e.g. if the photo booth takes a series of photos and creates prints and a GIF or MP4 slideshow the online gallery can display the slideshow, individual photos and print layout on a single page.
General Settings
Run Breeze Gallery Uploader and select File->Preferences... to display the "Preferences" dialog:

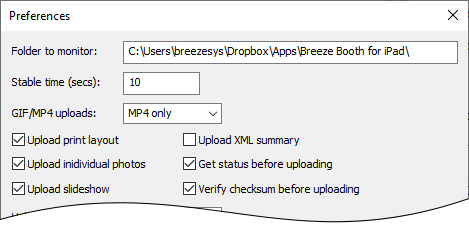
The upper portion of the "Preferences" dialog has settings which are the same whether you are uploading via HTTPS POST or to Hula Gallery.
Set the "Folder to monitor" to the folder to monitor for new images. In the screenshot above this has been set up to monitor the Dropbox folder where our Breeze Booth for iPad app saves images. You can also use tokens such as the {date} for today's date or {eventName} for the event name shared between our Windows based apps. If you are running a photo booth on a Windows PC using our DSLR Remote Pro software you could set the "Folder to monitor" to {documents}\PhotoboothImages\{dateLess8h}.
Set the stable time to allow time for delays transferring files to the folder to be monitored. These could be networking delays if the files are being synced via Dropbox or copied from another computer on a LAN. Breeze Gallery Uploader will wait for the size of new files to be unchanged for the stable time before uploading them.
The "GIF/MP4 uploads:" dropdown list setting specifies whether to upload GIFs only, MP4s only or both when both a GIF and a MP4 file is available.
Select "Upload print layout" to upload a copy of the print layout.
Select "Upload individual photos" to upload the individual photos. If the photo booth is set up to save a copy of the processed photos this option will upload the processed photos not the original unmodified photos from the camera.
Select "Upload slideshow" to upload the animated GIF or MP4 slideshow captured by the photo booth.
Select "Upload XML summary" to upload the photo booth XML summary. The XML summary file contains detailed information, such as survey data, about the session which can be used by some gallery software to provide statistics and analytics.
The "Get status before uploading" setting can be used to save network bandwidth by sending a small status request to the server and only uploading the image file if the image has not already been uploaded.
The "Verify checksum before uploading" setting checks the MD5 checksum read from the photo booth XML summary file with the MD5 checksum of the file to be uploaded before uploading the file. This setting is useful if the files are being transferred to computer running the uploader are delayed due to a slow network or other issues.
Our Breeze Booth for iPad app and recent versions of our Windows based DSLR Remote Pro photo booth software save the MD5 in the photo booth XML summary file. Older versions of DSLR Remote Pro may not save the MD5 checksum. If the MD5 checksum is not available in the XML summary file the uploader will upload the files using the "Stable time" setting above.
Uploading using HTTPS POST
The HTTPS POST option can be used to upload images to Photobooth Online Galerie (https://www.photobooth-deluxe.de/en/wordpress-photobooth-galerie-dokumentation/) or any other web based gallery system that has a suitable script to receive the uploaded files. Please see the technical details at the bottom of this page for information on writing a script to receive the files.
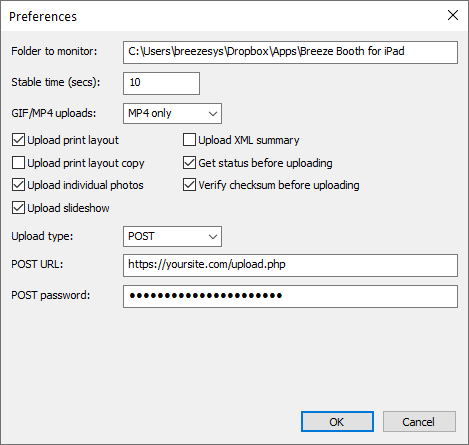
To use the HTTPS POST option set the "Upload type" to "POST":

Next set the "POST URL" to the URL of the script used to receive the uploaded files on the web server.
Set the "POST password" to the password used by the online gallery to provide additional security.
Please note: Photobooth Online Galerie is a subscription based gallery service run by PHOTOBOOTH DELUXE. Please see their support pages for help and documentation: https://www.photobooth-deluxe.de/en/wordpress-photobooth-galerie-dokumentation/
Uploading to Hula Gallery
Please note: Hula Gallery has been acquired by Darkroom Software who may have made changes to the way photos are uploaded which may prevent the Gallery Uploader from uploading to their online gallery system.
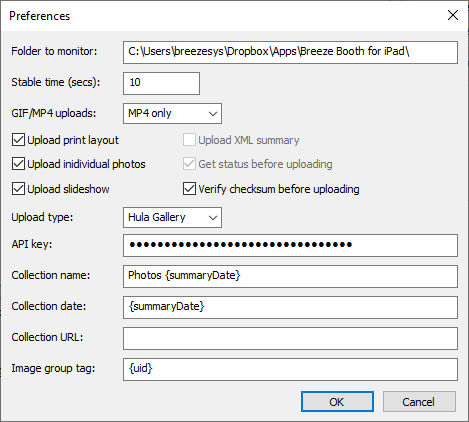
Set the "Upload type" to "Hula Gallery" to set up Breeze Gallery Uploader to upload files to Hula Gallery:

First enter your Hula Gallery API key in the "API Key" field. This can be found be logging into your Hula Gallery account and going to the account settings and clicking on the "API" section.
Next enter the collection name (aka gallery name) in the "Collection name" field. This field must only contain letters, numbers, spaces and hyphens. Tokens such as {summaryDate} or {eventName} can be used in this field.
Enter the collection date in the "Collection date" field. This must be in the form YYYY-MM-DD (e.g. 2019-09-15 for September 15, 2019). Tokens such as {summaryDate}, which reads the date from the XML summary file, can be used in this field.
Set the optional "Collection URL" field to create a custom URL for accessing a gallery. This must only contain letters, numbers and hyphens. Tokens such as {eventName} can also be used in this field.
Example: if your Hula Gallery subdomain name is photobooth and the collection URL is set to gallery2019 the URL of the gallery will be https://photobooth.hulagallery.com/gallery2019
The collection URL should not change for different uploads to the same collection. If a file with a different collection URL is uploaded to an existing collection the new collection URL is ignored.
The "Image group tag" is used to group images together (e.g. the print layout, the individual photos and a slideshow GIF) in the gallery pages. Files uploaded with the same tag will be displayed on the same gallery page. This field must only contain letters and numbers and can use tokens such as {uid}. The default setting is the {uid} token which extracts the eight character UID from the filenames of files created using our iPad based and Windows based photo booth software.
Uploading Files

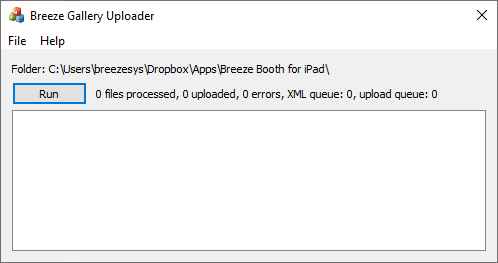
After setting up the upload method press the "Run" button to start uploading files. Breeze Gallery Uploader will scan the folder to be monitored and all its subfolders for photo booth XML summary files. The files will be added to the XML queue until the remain stable (i.e. the file size doesn't change) for the stable time and then they will be read and the files will be added to the upload queue. When a file has remained stable for the stable time (and its MD5 checksum matches the value in the XML summary file if the "Verify checksum before uploading" option is selected) it will be uploaded.
If the "Get status before uploading" option is selected a status request is sent to the server and the file is only uploaded if it isn't already on the server. If there is an error the file is placed in the upload queue for another attempt. If it fails 9 times the upload of that file is abandoned.
When in "run mode" Breeze Gallery Uploader will continuously monitor the folder to be monitored for new files and automatically add them to the XML and upload queues. This means that you can leave it running while a photo booth is in use and it will automatically upload new photos to the server as they are taken.
A log showing the date and time is displayed in the main part of the uploader's window. This can be saved to file for future reference by selecting File->Save log file...
Please note: Breeze Gallery Uploader does not keep a record of uploaded files between sessions. If the folder to be monitored contains galleries that have already been uploaded they will be scanned by the uploader each time it is run and any files it finds will be uploaded to the server again. Please use the "Get status before uploading" option to reduce internet usage if the uploader is setup to monitor folders of images that have already been uploaded. Alternatively use the {eventName} or date based tokens to specify the folder to be monitored so that it only scans the current event.
Command Line Options
Breeze Gallery Uploader can also be run using a desktop shortcut or a script with command line arguments to specify the settings. The following command line arguments can be used:
-a |
automatically enter run mode at startup |
<xml_settings_file> |
load the settings from an XML settings file |
The PHP script below shows how files sent by the Breeze Gallery Uploading using the HTTPS POST method can be received on a web site. This script is for illustrative purposes only and comes with no warranty or support. You are free to use this script or modify it as required, but if you do so you are responsible for checking that it is secure and meets your requirements.
The script handles two types of request:
| 1. | "get_status" which checks whether a file has already been loaded to the server (and doesn't include the actual file in the upload). The script responds with the JSON string: ("exists": true, "filename": "<filename>"} if the file exists or ("exists": false, "filename": "<filename>"} if it does not exist. |
| 2. | "upload" which uploads the file to the server. The script returns status code 200 if the upload is successful or an error code and message if there is an error. |
<?php
function logError($msg)
{
file_put_contents('../upload_log.txt', $msg . PHP_EOL, FILE_APPEND | LOCK_EX);
}
function fatalError($code, $msg)
{
// clear the old headers
header_remove();
// set the actual code
http_response_code($code);
// set the header to make sure cache is forced
header("Cache-Control: no-transform,public,max-age=300,s-maxage=900");
header('Content-Type: text/plain; charset=utf-8');
echo $msg;
logError($msg);
exit();
}
// replace this with a more secure password
$password = "photos";
// folder in which to store uploaded images
$destdir = "../gallery_uploads";
$id = $_POST["id"];
$request = $_POST["request"];
$filename = $_POST["filename"];
$chksum = $_POST["md5"];
$key = $_POST["key"];
// check client authentication string is correct
$localKey = "breeze" . $id . $password . $filename . $chksum;
if (sha1($localKey) != $key) {
fatalError(401, "Not authorized $key, " . sha1($localKey) . " id=$id, filename=$filename");
}
if ($request == "get_status")
{
// check whether file already exists on the server
$destFile = "$destdir/$filename";
$arr = array('exists' => file_exists($destFile), 'filename' => $filename);
fatalError(400, json_encode($arr));
}
else if ($request != "upload")
{
// check whether it is an upload request
fatalError(400, "Invalid request: $request");
}
try {
// Undefined | Multiple Files | $_FILES Corruption Attack
// If this request falls under any of them, treat it invalid.
if (!isset($_FILES['fileToUpload']['error']) || is_array($_FILES['fileToUpload']['error'])) {
fatalError(400, "Invalid parameters");
}
// Check $_FILES['fileToUpload']['error'] value.
switch ($_FILES['fileToUpload']['error']) {
case UPLOAD_ERR_OK:
break;
case UPLOAD_ERR_NO_FILE:
fatalError(400, 'No file sent');
case UPLOAD_ERR_INI_SIZE:
case UPLOAD_ERR_FORM_SIZE:
fatalError(400, 'Exceeded form file size limit');
default:
fatalError(400, 'Unknown error');
}
// Check MIME type
$finfo = new finfo(FILEINFO_MIME_TYPE);
$mimeType = $finfo->file($_FILES['fileToUpload']['tmp_name']);
if (false === array_search(
$mimeType,
array(
'image/jpeg',
'image/gif',
'video/mp4',
'video/quicktime',
'text/xml',
)
)) {
fatalError(400, "Unexpected MIME type: " . $mimeType);
}
$srcFile = $_FILES["fileToUpload"]["tmp_name"];
// check file is JPEG, GIF, MP4 or XML
$fileType = strtolower(pathinfo($filename,PATHINFO_EXTENSION));
if ($fileType != "jpg" && $fileType != "gif" && $fileType != "mp4" && $fileType != "xml" ) {
fatalError(400, "File type not allowed");
}
// check MD5 checksum matches uploaded file
if (strcasecmp(md5_file($_FILES["fileToUpload"]["tmp_name"]), $chksum) != 0) {
fatalError(400, "MD5 checksum incorrect");
}
// read filename and dir from $filename and create dir if it doesn't already exist
[ 'basename' => $basename, 'dirname' => $dirname ] = pathinfo($filename);
$destFile = "$destdir/$basename";
if (strlen($dirname) > 0)
{
$dir = "$destdir/$dirname";
if (!file_exists($dir)) {
mkdir($dir, 0777, true);
}
if (file_exists($dir)) {
$destFile = "$dir/$basename";
}
}
// move the uploaded file to the upload folder
if (move_uploaded_file($srcFile, $destFile)) {
header('Content-Type: text/plain; charset=utf-8');
echo "File: $destFile";
} else {
logError("move_uploaded_file($srcFile, $destFile) failed");
fatalError(400, "Error copying file to upload folder: $destFile");
}
} catch (RuntimeException $e) {
fatalError(400, $e->getMessage());
}
?>