Introduction
Breeze Hub is free Windows based software that can be used with both Breeze Booth for iPad and with Windows based photo booth apps by Breeze Systems.
When used with Breeze Booth for iPad Breeze Hub allows photos to be automatically printed and shared by email and text. The output from the iPad can be automatically downloaded to a Windows PC where it can be printed, emailed or shared using applications such as Breeze Kiosk or uploaded to an online gallery or microsite using FTP software.
Breeze Hub can also be used to send fully formatted HTML emails with multiple attachments from our DSLR Remote Pro and Breeze Kiosk applications. One copy of Breeze Hub can process the output from multiple iPads and multiple copies of DSLR Remote Pro and Breeze Kiosk.
Breeze Hub can also be generate statistics such as the number of sessions and shares per hour or to extract survey responses from users. These tools work with both Breeze Booth for iPad and DSLR Remote Pro.
Setup
There are two methods for transferring the output from the iPad to a folder where it can be processed by Breeze Hub:
| 1. | Directly via a local wifi network |
| 2. | Indirectly via Dropbox by saving the output to Dropbox and monitoring the Dropbox folder on a PC running Breeze Hub |
The first option does not require an internet connection and provides a way of quickly syncing the output from one or more iPads to a Windows PC connected to the same local network. Use this option to print from the iPad app to any Windows compatible printer. Note: the app can also print directly to an AirPrint compatible printer without using Breeze Hub.
The Dropbox option allows the Windows PC running Breeze Hub to be located anywhere there is an internet connection. A single Windows PC could be located back at base and used to send emails and texts from multiple iPad and Windows photo booths located at different venues. This option doesn't support printing from iPads.
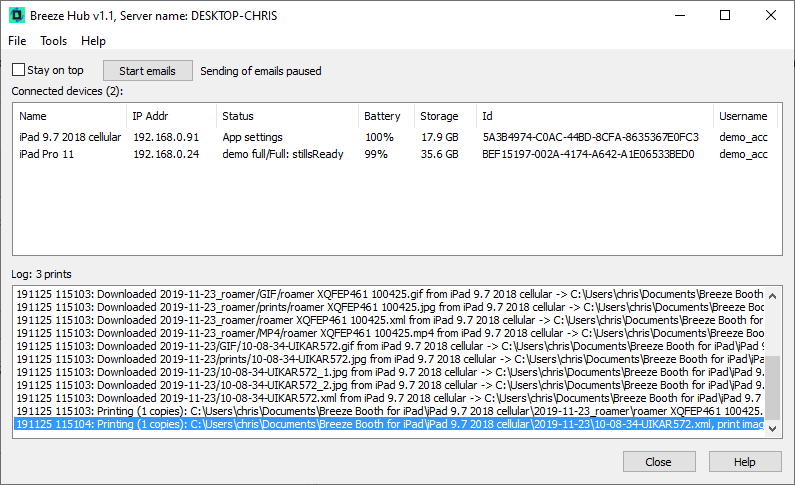
The main window displays a list of connected iPads, their IP address, the screen they are currently displaying, the storage space, the vendor id and the username if the iPad is signed in. The log area in the main window shows a list of files downloaded from connected iPads together with printing and other status information.
If you want to print photos from an iPad using Breeze Hub select "Printer setup..." from the "File" menu:
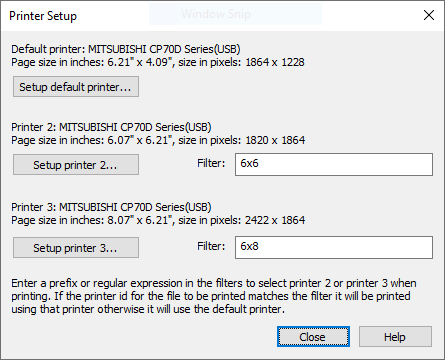
Up to three different sets of printer settings can be defined to allow the photo booth to offer guests a choice of print formats e.g. 6x2 strips, 6x4 photos and square 6x6 photos. When an event is created in the event editor a printer id can be defined in the photo settings and Breeze Hub uses this to load the appropriate printer settings by comparing it with the filter values in the "Printer setup" dialog. The filters can be a simple text prefix (e.g. 6x2 or 6x4) or a regular expression (e.g. 6x2.*DNP). When printing photos Breeze Hub will compare the printer id against the filter for printer 2 and will use those printer settings if the filter matches the printer id and the printer is defined. If printer 2 doesn't match it compares the printer id against the filter for printer 3. If this doesn't match it will print using the default printer settings.
Example: Breeze Booth is set up to offer guests three different print options: traditional 6x2 strips, 6x6 square prints or 6x8 large prints. The printer ids for these settings could be set to 6x2, 6x6 and 6x8 respectively and Breeze Hub would be set up so that the default printer prints 6x2 strips, printer 2 is set up for 6x6 printers has the filter "6x6", printer 3 is set up for 6x8 printers has the filter "6x8"
Please note: You can print photos from an iPad using Breeze Hub with any printer that is compatible with Windows or you can use AirPrint to print directly from the iPad to an AirPrint compatible printer (see Printing).
Next select "Preferences" from the "File" menu to setup the sync server, printing and sharing preferences:
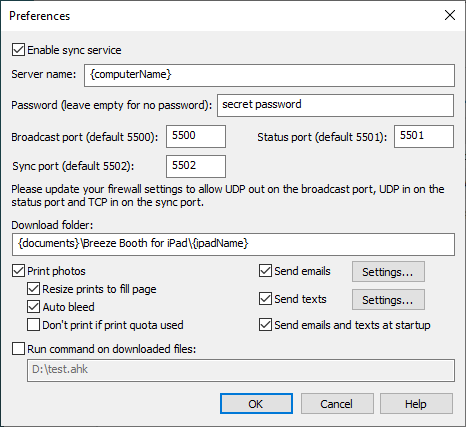
Select "Enable sync service" to automatically transfer files from an iPad running Breeze Booth for iPad to a Windows PC for printing or sharing.
Leave this option unselected if you are only using Breeze Hub to send emails and texts from our Windows based photo booth software.
Set the server name to identify the server. This will be displayed in the App Settings screen on the iPad. The default is the token {computerName} which is the name of the computer it is running on.
Set an optional password if you require additional security for files being downloaded from iPads. If a password is set the same password has to be entered on each iPad in the "App Settings". The password is used to sign each file that is sent by Breeze Booth and Breeze Hub will refuse to accept the file if the password is incorrect. Please note the actual password is not sent with the files. Instead the iles are signed using the password. This means that the password cannot be stolen if the system is running on an insecure network. Breeze Hub will only accept JPEG photos, GIF files, MP4 movie files, XML files or journal text files. All other file types are rejected.
Breeze Hub uses three internet ports for communicating with connected iPads:
| 1. | Broadcast port: this is used to send UDP broadcast messages to tell iPads about the server. The default port number is 5500. You may need to configure the firewall software on the computer to allow UPD outward messages on this port |
| 2. | Status port: this is used to receive UDP status messages from iPads connected to the server. The default port number is 5501. You may need to configure the firewall software on the computer to allow UPD inward messages on this port |
| 3. | Sync port: this is used to receive files from iPads connected to the server. The default port number is 5502. You may need to configure the firewall software on the computer to allow TCP inwards messages on this port |
The download folder specifies where the downloaded files should be saved. The default setting is {documents}\Breeze Booth\{iPadName}. The tokens enclosed on curly brackets are replaced with the actual values when the files are downloaded. {documents} is replaced with the path of the Documents folder for the current login e.g. C:\Users\Chris\Documents. {iPadName} is replaced with the name of the iPad sending the file. Please take care to only use characters that are allowed in Windows filenames when naming the iPads if you use the {ipadName} token i.e. avoid using < > ? * / \ : | "
The token {path} can also be used in the download folder. This expands to the relative pathname of the file being downloaded and is useful if you want to download files to different folders based on their filenames.
e.g. the following download path can be used to download files ending in _1.jpg to the folder named Hotfolder and all other files to the folder named with the iPad's name:
{documents}\Breeze Booth\{if,{compare,{right,5,{path}},_1.jpg},Hotfolder,{iPadName}}
Tip: If you are running an event with multiple iPads and want to share the photos using sharing software running on the PC you may wish to remove the {ipadName} from the download folder path and replace it with the event name so that the photos from all iPads are downloaded to the same folder.
Automatically printing photos from an iPad
Select "Print photos" to automatically print photos when they are received. The number of copies to be printed is read from the XML summary file received from the iPad. The summary file has a similar format to the summary files from our Windows based photo booth applications.
The print layout is automatically rotated to match the printer's page orientation before printing. Select the "Resize prints to fill page" option if the prints are smaller than the page size. Select the "Auto bleed" option if the prints have colored borders. This will extend the borders of the print to fill the printable area when printing to avoid possible white margins caused by the printer heads not being perfectly aligned.
Select "Don't print if print quota used" to only print the number of prints set up in the event info. Each time Breeze Hub prints a photo it decrements the print counter and when this reaches zero Breeze Hub won't print any more photos if "Don't print if print quota used" is selected. The print counter is the same print counter that can be shared with Breeze Booth for Windows and other apps from Breeze Systems. Breeze Hub broadcasts the current value of the print counter to connected iPads and they can access it using the {printCounter} token.
Automatically Emailing and Texting
Breeze Hub can automatically send emails and SMS text messages using the email addresses and phone numbers entered in the iPad app's sharing screens. The iPad saves the email and text messages in XML files (with email_ or text_ prefixes) and Breeze Hub can send them automatically when they are downloaded to the PC.
Breeze Hub can also send emails and texts from our Windows based photo booth applications. Using Breeze Hub to send emails from our Windows based photo booth applications gives more flexibility over email attachments and allows the emails to be sent in the background without the photo booth app having to wait.
Select "Send emails" to automatically send emails and "Send texts" to automatically send SMS text messages.
Setting up emails
Select "Send emails" and then click on "Settings..." to set up your email settings:
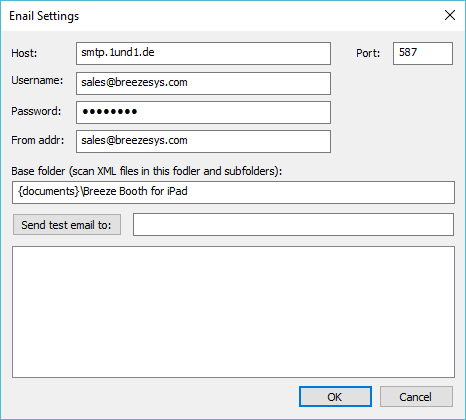
To send an email you need to specify the host name and port number of your email server. Most email servers also require a username and a password to prevent unauthorized users from sending spam emails. The port number should normally be set to 587 when using SSL secure email or 25 otherwise (please check the port numbers used by your ISP). Set the "Email addr:" to the sender's email address. To include the name of the sender with the email address enter it as the name followed by the email address enclosed in angle brackets e.g. "Acme Photo Booth <photobooth@acme.com>". Most free email services require the sender's email address to the be the same as that of the email account specified by the username and password.
Check the email settings by entering an email address and pressing the "Send test email to:" button.
Please note: If you are using Google GMail to send emails you need to go to your Google account settings and set the "Access for less secure apps" option to "Turn on" otherwise GMail will refuse to send the email. Google limit the number of emails that can be sent from a GMail account to 100-150 emails in a 24 hour period which may not be enough for photo booth usage. If this is a problem please consider using a dedicated email service such as Postmark or SendGrid.
Finally, set the "Base folder (Scan XML files in this folder and subfolders)" to the location where the files are downloaded from the iPads. Normally this is the same as the "Download folder" specified in the "Preferences" dialog.
Setting up texts
Breeze Hub can send SMS text messages using using a web-based service called Twilio (www.twilio.com). To make the most of this you need to upload the files to a web site and include the URL in the SMS message.
To use this service you need an account with Twilio and enter your Twilio account details in the "Text Message Settings" dialog. Twilio charge for each MMS or SMS message sent using their service. Please see their website for pricing information.
The SMS settings need to be setup so that the program can send the texts via Twilio. The "Text Message Settings" dialog can be opened by selecting "Send texts" and clicking on the "Settings...":
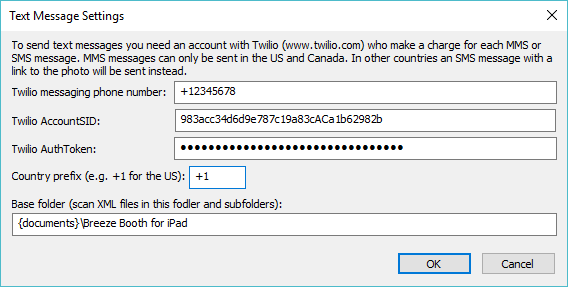
Enter your Twilio message phone number, AccountSID and AuthToken in the "Text Message Settings" dialog. You can find your Twilio message phone number, AccountSID and AuthToken by logging into your Twilio account.
Set the country prefix to your country prefix e.g. +1 for the US and Canada, +44 for the UK, +49 for Germany etc. When users enter their cellphone numbers they can either enter the number with their country prefix e.g. +1234567890 or without it e.g. 023456789 and the country prefix will be added automatically before sending the text.
Finally, set the "Base folder (Scan XML files in this folder and subfolders)" to the location where the files are downloaded from the iPads. Normally this is the same as the "Download folder" specified in the "Preferences" dialog.
Breeze Hub allows Breeze Booth for iPad to use the same event info as other apps from Breeze Systems. Event information can be defined and used in filenames, captions and the messages used when sharing photos. The information is saved in the Windows registry so that it may be shared with other applications and is read from the Windows registry before it is used so that it can use information supplied by other applications. The "Photo Booth Event Info" dialog can be displayed by selecting "Event info..." from the File menu:
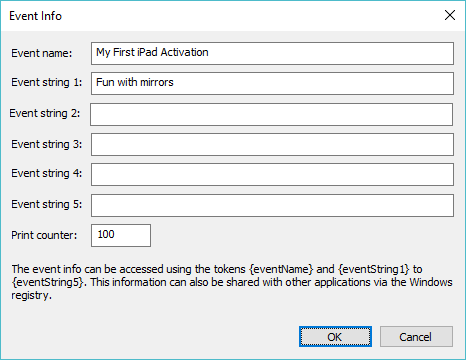
The event info can be used in filenames, caption text in print layouts or in the message text used when sharing photos by using the tokens below. The information is also saved in the Windows registry using the registry key so that it can be shared with other applications:
HKEY_CURRENT_USER\Software\BreezeSystems\Event Info
Please note: Do not use the characters \ / : * ? " | < > in the event info if it is going to be used to define filenames. Windows does not allow these characters to be used in filenames and this may prevent the files from being saved.
Item |
Token |
Registry value |
Event Name |
{eventName} |
HKEY_CURRENT_USER\Software\BreezeSystems\Event Info\EventName |
Event String 1 |
{eventString1} |
HKEY_CURRENT_USER\Software\BreezeSystems\Event Info\EventString1 |
Event String 2 |
{eventString2} |
HKEY_CURRENT_USER\Software\BreezeSystems\Event Info\EventString2 |
Event String 3 |
{eventString3} |
HKEY_CURRENT_USER\Software\BreezeSystems\Event Info\EventString3 |
Event String 4 |
{eventString4} |
HKEY_CURRENT_USER\Software\BreezeSystems\Event Info\EventString4 |
Event String 5 |
{eventString5} |
HKEY_CURRENT_USER\Software\BreezeSystems\Event Info\EventString5 |
Print counter |
{printCounter} |
HKEY_CURRENT_USER\Software\BreezeSystems\Event Info\PrintCounter |
The values of the event name, event strings and printer can be displayed in the iPad app by tapping on "App Settings".
The print counter is decremented each time Breeze Hub prints a photo. Print quotas can be used by setting the print counter to the number of prints allowed for an event and then selecting "Don't print if print quota is used" in Breeze Hub's preferences.
Tap on "App Settings" in Breeze Booth's start screen to set it up to send files to Breeze Hub for printing or sharing:
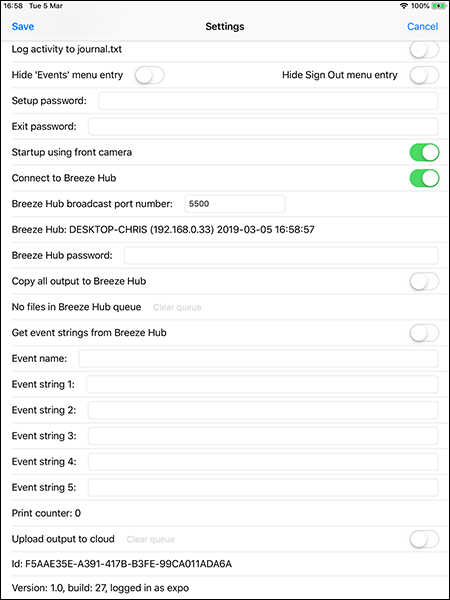
Select "Connect to Breeze Hub" and check that the "Breeze Hub broadcast port number" is the same as the sync port setup in Breeze Hub. The default port number is 5500. If Breeze Hub is running on a computer on the same network you should see appear on the Breeze Hub line. If it shows <none> please check that the iPad and computer running the server are connected to the same network and check the firewall settings on the server computer.
If a password has been set in Breeze Hub the same password needs to be entered in the "Server password" field on the iPad otherwise the server will refuse to accept the files.
Select "Copy all output to Breeze Hub" if you want all output including animated GIFs and MP4 files to be sent to Breeze Hub. This is useful if you wish to upload the photos to a website using FTP syncing tools such as GoodSync or to use sharing software such as Breeze Kiosk to share the output from the iPad via email, text or Twitter on the Windows computer. When the "Copy all output to Breeze Hub" option is not selected only the photos, print layout and XML summary file will be sent to the sync server.
Updating firewall settings on the Windows computer
In order to use Breeze Hub to sync files from Breeze Booth for iPad you may need to edit the firewall settings on your computer:
| 1. | If you don't see Breeze Hub in Breeze Booth's "App Settings" you may need to enable outgoing UDP packets on the sync port (default setting: 5500) |
| 2. | If you don't see the iPad listed in the "Connected iPads" display in Breeze Hub on the Windows PC you may need to enable incoming UDP packets on the status port (default setting: 5501) |
| 3. | If files are not transferred to Breeze Hub you may need to enable incoming TCP packets on the sync port (default setting: 5502) |
When you run Breeze Hub for the first time you may see a warning dialog like the one below:
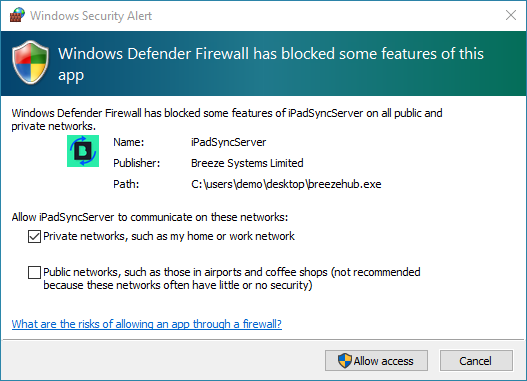
This is normal and shows that Breeze Hub is attempting to communicate with iPads running Breeze Booth for iPad on your network. To continue select "Private networks, such as my home or work network" and click "Allow access". After allowing network access Breeze Hub should work without requiring any other changes to your firewall settings.
Some firewall software (e.g. AVG) will work if you set the network connection type to "private" not "public".
If the above settings don't work you may need to set the firewall settings manually. The actual settings will depend on the firewall software that is running on the PC.
Please see the help files for your firewall for information on how to configure the settings.
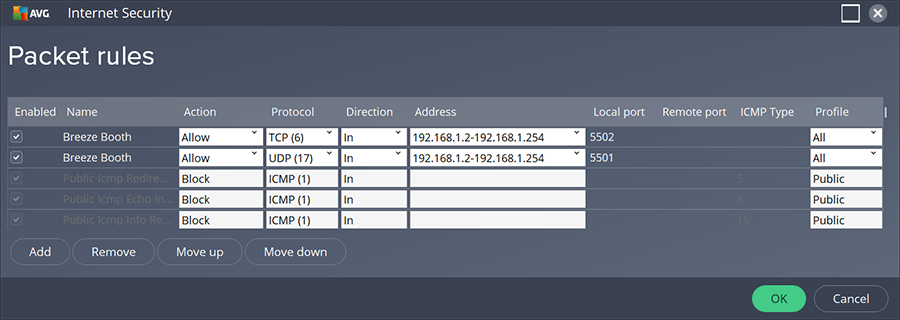
Sample settings for Windows Firewall and AVG are shown below.
The address range "Local Address" values will depend on your network. Open a Windows PowerShell window and enter the command ipconfig to display information about your network. The first three numbers in the IPv4 Address should be used for the first three numbers for addresses when setting the firewall rules.
Sample firewall settings for Windows Defender firewall
To open Windows Defender Firewall click on the Windows Start button in the taskbar at the bottom left corner of the screen, type "Defender" and then click on the "Windows Defender Firewall" icon. Next, click on "Advanced settings" to open the "Windows Defender Firewall with Advanced Security" window and then click on "Inbound Rules". Click on "New Rule..." on the right to add new inbound rules if required:

Sample firewall settings for AVG firewall
Double click on the AVG desktop icon to open the main AVG Internet Security dashboard. The select "Settings" from "Menu" in the top right of the window. Click on "Full protection" and then click on "Packet Rules" in the "Enhanced Firewall" tab to display the "Packet rules" window. Click on the "Add" button to add new rules if required:
Email and Texting Reporting Tool
The email and texting reporting tool can be used to create a report showing the number of emails and texts sent using the output from Breeze Booth for iPad or from our Windows based photo booth apps.
Select Emails and Texts... from the Tools menu to run the email and texting reporting tool:
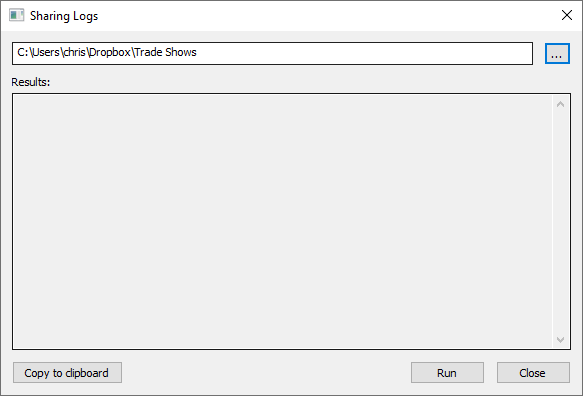
The email and text reporting tool works by scanning folder where the photo booth photos are saved looking for XML email and text files and reading this information to create a summary of the emails and texts. Enter the base folder in the edit box or press the "..." button to open a browser to select the folder. Then press the "Run" button to scan the folder and all its subfolders:
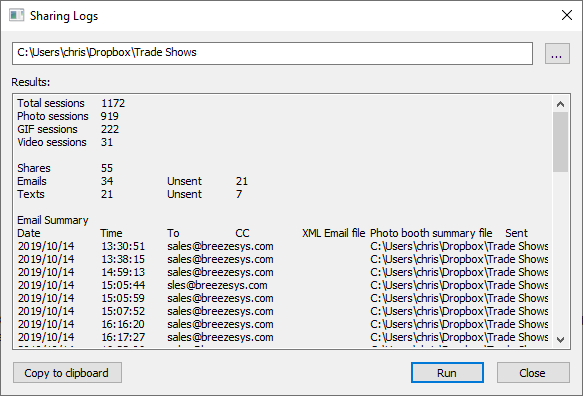
The results will show a summary of the total number of sessions and the breakdown between photos, GIFs and video sessions. It also shows the number of shares by email and by text.
This is followed by two tables: one showing email shares and one showing text shares. These tables use tab delimited fields which can be copied and pasted into a spreadsheet such as Microsoft Excel where the data can be displayed as a graph. A portion of the results can be selected by holding the left mouse button down and selected the required text or the whole report can be selected by clicking on the "Copy to clipboard" button. Then copy and paste the data into a spreadsheet for analysis.
The statistics tool can be used to create a report using the output from Breeze Booth for iPad or from our Windows based photo booth apps.
Select Stats... from the Tools menu to run the statistics tool:
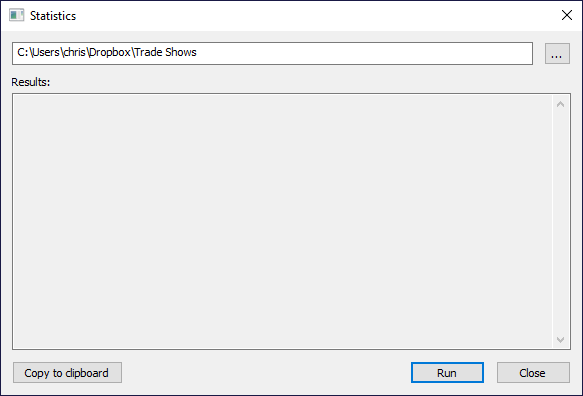
The statistics tool works by scanning folder where the photo booth photos are saved for XML summary files and reading this information to create a summary of the number of sessions and shares. Enter the base folder in the edit box or press the "..." button to open a browser to select the folder. Then press the "Run" button to scan the folder and all its subfolders:
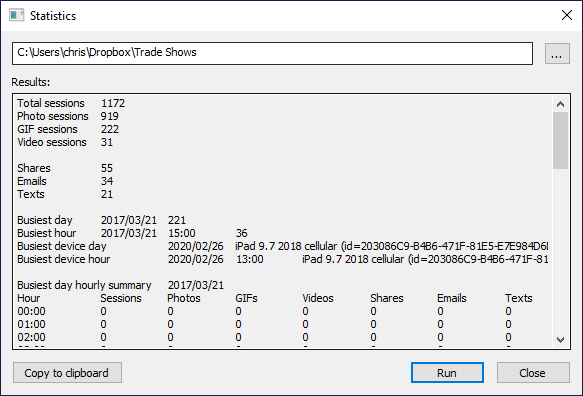
The results will show a summary of the total number of sessions and the breakdown between photos, GIFs and video sessions. It also shows the number of shares by email and by text.
The next session shows the busiest day and busiest hour for the period for all devices together with the busiest day and hour for a single device.
The busiest day is then shown as a table giving a hour by hour summary of the number and type of sessions and the shares.
Lastly, a table giving a day by day summary for the last 30 days is displayed showing the number and type of sessions and the shares.
These tables use tab delimited fields which can be copied and pasted into a spreadsheet such as Microsoft Excel where the data can be displayed as a graph. A portion of the results can be selected by holding the left mouse button down and selected the required text or the whole report can be selected by clicking the "Copy to clipboard" button. Then copy and paste the data into a spreadsheet for analysis.
The survey data tool can be used to create a report showinf survey responses using the output from Breeze Booth for iPad or from our Windows based photo booth apps.
Select "Survey data..." from the Tools menu to run the survey data tool:
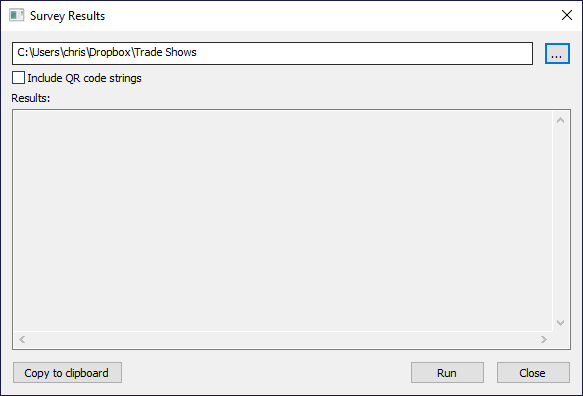
The survey data tool works by scanning folder where the photo booth photos are saved for XML summary files and reading this information to create a report showing responses to surveys. Enter the base folder in the edit box or press the "..." button to open a browser to select the folder. Select "Include QR code strings" to include data such as users' email addresses when using QR codes to run a contactless photo booth.
Then press the "Run" button to scan the folder and all its subfolders:
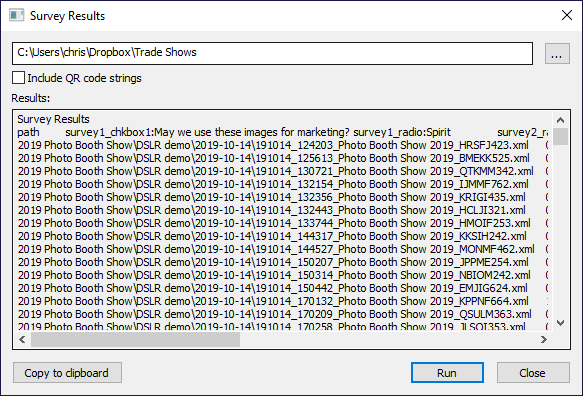
The results a table of each session that gathered survey data.
The first row of the table gives the headings for each column: 'path' for the path of the XML summary file followed by one or more headings for each of the survey results in the form: survey screen number (e.g. survey1), response type (e.g. chkbox, text or radio), response identifier.
The remaining rows show the responses to each session and start with the path of the XML summary file followed by a list of responses to each question in the survey.
The table uses tab delimited fields which can be copied and pasted into a spreadsheet such as Microsoft Excel where the data can be displayed as a graph or analysed. A portion of the results can be selected by holding the left mouse button down and selected the required text or the whole report can be selected by clicking the "Copy to clipboard" button. Then copy and paste the data into a spreadsheet for analysis.