Breeze Booth supports the sharing of photos, animated GIFs and MP4 movie files by email either directly from the iPad using SMTP email or by using a separate utility, such as Breeze Hub, running on a PC.
It also supports SMS text messages which can be sent directly from the iPad via Twilio or by using a separate utility, such as Breeze Hub, running on a PC.
By default emails will be sent using the email server provided with your Breeze Booth for iPad subscription. If you wish to use a different email server you can do this by selecting the custom SMTP option in App Settings.
Tap on the "Share" tab in the "Photo Booth Settings" dialog to edit the sharing settings:
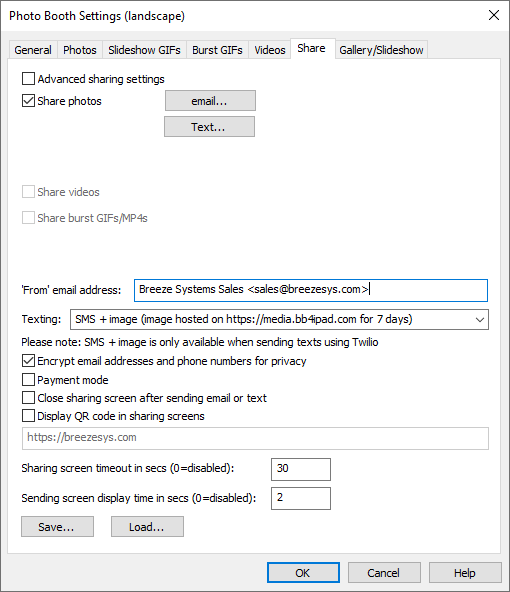
Select "Share photos" to share print layouts and/or slideshow GIFs and "Share burst GIFs/MP4s" to share burst GIFs or MP4 copies of burst GIFs.
The standard sharing settings provide a single pre-formatted message when sharing photos, GIFs or MP4 movies by email and a single text message when texting. An advanced option is also available if you require complete control over the email message appearance or the way files are attached to email messages.
Set the "From email address" to the "From" or "Reply to" email address of sent emails. If this field is left empty the from email address will default to the email address associated with the account used to send the emails.
This field can be set to an email address e.g. "sales@breezesys.com", or a name and email address e.g. "Breeze Systems Sales <sales@breezesys.com>".
Please note:
| 1. | Some free email providers ignore this setting and set the from email address to the email address associated with the email account used to send the emails |
| 2. | When using the default SMTP email server included with the Breeze Booth for iPad subscription the from address will be set to noreply@breezesys.com and the "reply to" address will be set to the email address entered in the "from address field". You can provide name for the from address by adding it first and then enclosing the email address in angle brackets e.g. Acme Photo Booth <sales@acme.com>. This display the email as from "Acme Photo Booth" and hide the noreply@breezesys.com on most devices. |
Tokens
Tokens can be used in the email subject and email message and in texts to include dynamically generated information such as the date and time the photos were taken or the event name. They can also be used to provide a link to the image in an online gallery or microsite e.g.
Your photos from {eventName}: {tinyUrl,https://mysite.com/gallery?id={uid}}
The {tinyUrl,str} token is useful for shortening URLs when sending text messages.
The {uid} token is useful for enhancing privacy when using microsites by giving each photo or GIF a unique, hard to guess id.
Emails - standard sharing settings
Click on the "email..." button to edit the email message:
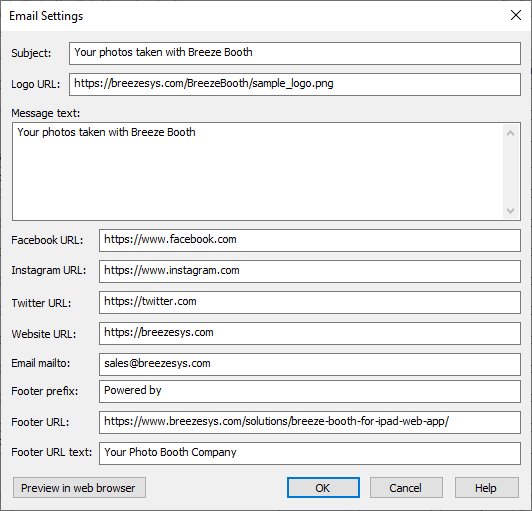
The "Subject:" is used to specify the subject line of the email.
The email message uses a responsive design to create attractive looking emails that display correctly in a wide range of devices from phones to tablets and computers. The message is divided up into the following sections:
| • | Logo:URL - link to an optional logo displayed at the top of the message. The logo can be a JPEG or PNG image or an animated GIF and needs to be hosted on a website. Empty the logo URL text to suppress the logo display. |
| • | Message text - a message displayed under the logo. The text is centered and can contain HTML markup to format the text, add new lines etc. Add <br> at the end of each line to add line breaks e.g. First line<br>Second line. |
| • | Social media links - displayed as a row of icons under the message text: |
| • | Facebook URL - optional link to your client's or your own Facebook page. Leave this blank to hide the icon and link |
| • | Instagram URL - optional link to your client's or your own Instagram page. Leave this blank to hide the icon and link |
| • | Twitter URL - optional link to your client's or your own Twitter feed. Leave this blank to hide the icon and link |
| • | Website URL - optional link to your client's or your own website. Leave this blank to hide the icon and link |
| • | Email mailto - optional link to your client's or your own email address. Leave this blank to hide the icon and link |
| • | Footer prefix - optional text prefixing the URL below the social media links |
| • | Footer URL - URL for optional URL below the social media links |
| • | Footer text - text displayed for the hypertext link for the optional URL below the social media links |
Click on the "Preview in web browser" to display a preview of the email using the currently entered settings.
Leave a section empty if you don't want it to be included in the email e.g. if you don't require the footer text and website link leave the footer prefix, footer URL and footer URL text fields empty.
The standard sharing settings only support a single attachment when sending emails.
Photo or GIF sessions that generate MP4 videos will a JPEG preview from the MP4 file in the email and add the actual MP4 as a file attachment.
Photo or GIF sessions that generate animated GIFs will embed the animated GIF in the email.
Photo only sessions which don't generate slideshow GIFs/MP4s will embed the JPEG print layout in the email.
You can use the advanced sharing option if you need more control over the email appearance and attachments e.g. sending an animated GIF and the individual photos when capturing slideshows.
Emails - advanced sharing settings
Select "Advanced sharing settings" to display the advanced sharing options. These allow complete control over the appearance of emails and image attachments. They also provide separate emails and texts for photo, slideshow and burst GIF sessions.
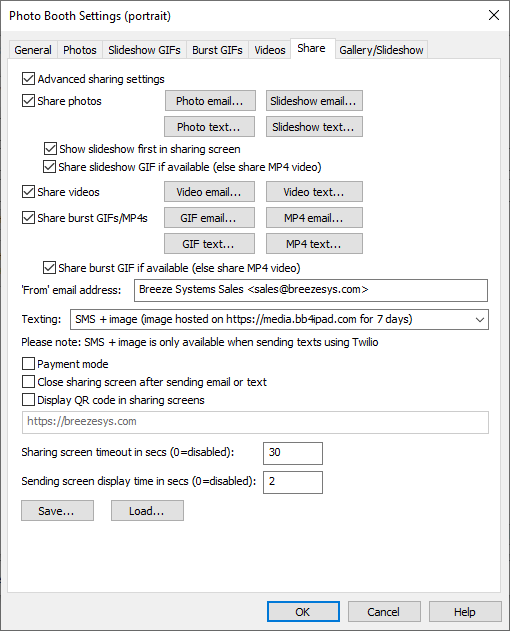
Click on "Photo email..." or "Slideshow email..." to edit the message text and set up email attachments:
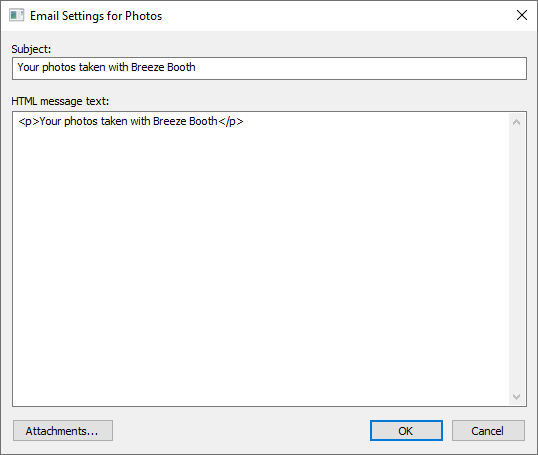
Enter the email subject line in the "Subject" box and the HTML formatted email in the "HTML message text area". Both the subject and the HTML message text can contain tokens to include information that is evaluated at run time such as the time, event name or information obtained from the survey screens.
Click on "Attachments..." to specify the attachments that should be added to the email:
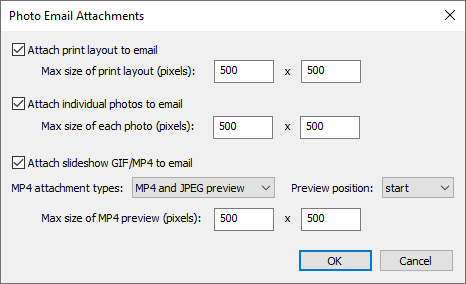
Select "Attach print layout to email" to attach a JPEG copy of the print layout to the email. Use the "Max size of print layout (pixels)" setting to specify the maximum size of the image e.g. a 6" x 4" print created for a 600 DPI printer is 3600 x 2400 pixels in size. By setting the maximum photo size to 500 x 500 pixels it will be resized so that it fits within a box 500 x 500 pixels i.e. it will be resized to 500 x 333 pixels before being attached to the email.
Copies of the individual photos taken can also be attached to the email by selecting "Attach individual photos to email". Use the "Max size of each photo (pixels)" setting to specify the maximum size of the photo e.g. a photo from a 2018 iPad 9.7" is 960 x 1280 pixels in size. By setting the maximum size to 500 x 500 pixels it will be resized so that it fits within a box 500 x 500 pixels i.e. it will be resized to 375 x 500 pixels before before being attached to the email.
Note: If "Save copy of processed photos" is selected in the Photo Settings tab the processed photo will be attached to the email instead of the original photo. The processed photo can be branded by adding a PNG overlay named processed_photo_overlay.png.
If the slideshow option is selected you can also attach a copy of the slideshow to the email. Slideshow GIFs will be attached to the email without resizing. When sharing the MP4 copy of the slideshow you can use the "MP4 attachment types" dropdown list to select "MP4 only", "JPEG preview only" or "Mp4 and JPEG preview". MP4 files can't be embedded in HTML emails and will be sent as a file attachment. The JPEG preview options allow a JPEG preview extracted from the slideshow to be embedded in the email to provide a preview showing a frame from the start, middle or end of the video (selected using the "Preview position" dropdown list). Use the "Max size of MP4 preview (pixels)" setting to specify the maximum size of the JPEG preview image.
Click on "GIF email..." or "MP4 email..." to edit the email sent when sharing burst GIFs or MP4s:
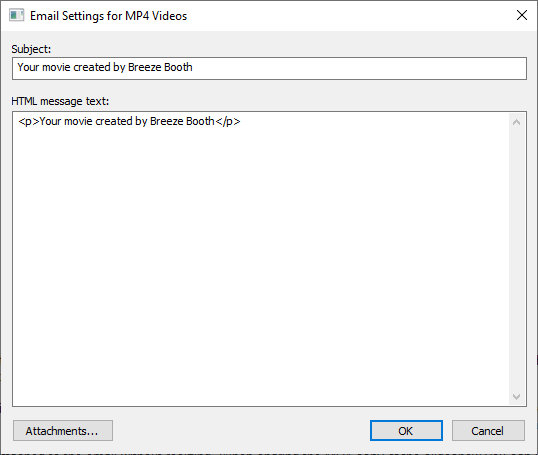
Enter the email subject line in the "Subject" box and the HTML formatted email in the "HTML message text area". Both the subject and the HTML message text can contain tokens to include information that is evaluated at run time such as the time, event name or information obtained from the survey screens.
Click on "Attachments..." to specify the attachments that should be added to the email:
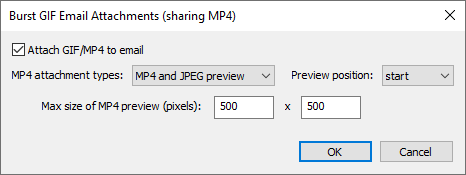
When emailing MP4 copies of burst GIFs you can also attach a JPEG preview copy of the MP4 to the email. When sharing the MP4 copy of the burst GIF you can use the "MP4 attachment types" dropdown list to select "MP4 only", "JPEG preview only" or "Mp4 and JPEG preview". MP4 files can't be embedded in HTML emails and will be sent as a file attachment. The JPEG preview options allow a JPEG preview extracted from the MP4 file to be embedded in the email to provide a preview showing a frame from the start, middle or end of the video (selected using the "Preview position" dropdown list). Use the "Max size of MP4 preview (pixels)" setting to specify the maximum size of the JPEG preview image.
HTML emails when using advanced sharing settings
The advanced sharing option gives complete control over the formatting of HTML emails. JPEG photos and GIF images can be embedded within the email using the HTML <img> tag and the {image} tokens e.g.
<p>Here are your photos taken with Breeze Booth at {eventName}</p>
<p><img src="{image}"></p>
<p>We hope you had a great time!</p>
MP4 movie files can't be embedded within emails and are sent as file attachments but JPEG previews from the MP4 movie can be embedded.
The email can contain zero or more attachments depending on the type of capture (e.g. photos only, photos + slideshow, burst GIF) and the attachment settings. When multiple attachments are available the tokens used to embed them in the HTML email are numbered e.g. {image} or {image1} for the first attachment, {image2} for the second attachment, {image3} for the third attachment etc.
You can also use the following tokens:
{print_layout} - the JPEG copy of the print layout
{photo<n>} - individual photos e.g. {photo1}, {photo2} etc.
{thumbnail<n>} - individual thumbnails e.g. {thumbnail1}, {thumbnail2} etc.
{gif} - slideshow GIF or boomerang GIF
{video_preview} - JPEG preview of the video
The examples below show simple examples of HTML emails from a photo session with 3 photos and a slideshow saved as an MP4 movie. If the print layout, individual photos and MP4 preview attachment options are all selected the tokens for embedding the images would be:
{print_layout} or {image} or {image1} - the JPEG print layout
{photo1} or {image2} - copy of photo #1
{photo2} or {image3} - copy of photo #2
{photo3} or {image4} - copy of photo #3
{video_preview} or {image5} - JPEG preview of MP4 slideshow
Example 1: HTML email with no attachments and a link to a microsite (no attachments selected in the attachments dialog)
<p><strong>Your photos taken with Breeze Booth at {eventName}</strong></p>
<p><a href="https://yoursite.com/viewer.php?id={uid}">View your photos...</a></p>
Example 2: HTML email attaching the print layout (only the print layout attachment selected in the attachments dialog)
<p><strong>Your photos taken with Breeze Booth at {eventName}</strong></p>
<p><img src="{print_layout}" border="1"></p>
or
<p><strong>Your photos taken with Breeze Booth at {eventName}</strong></p>
<p><img src="{image}" border="1"></p>
Example 3: HTML email attaching the print layout and copies of the individual photos (print layout and individual photo attachments selected in the attachments dialog)
<p><strong>Your photos taken with Breeze Booth at {eventName}</strong></p>
<p>Print layout:<br><img src="{print_layout}" border="1"></p>
<p>Individual photos:<br><img src="{photo1}"> <img src="{photo2}"> <img src="{photo3}"></p>
or
<p><strong>Your photos taken with Breeze Booth at {eventName}</strong></p>
<p>Print layout:<br><img src="{image}" border="1"></p>
<p>Individual photos:<br><img src="{image2}"> <img src="{image3}"> <img src="{image4}"></p>
Example 4: HTML email attaching the print layout, a preview of the MP4 slideshow and the MP4 slideshow (print layout and "MP4 + JPEG preview" attachments selected in the attachments dialog)
<p><strong>Your photos taken with Breeze Booth at {eventName}</strong></p>
<p>Print layout:<br><img src="{print_layout}" border="1"></p>
<p>Slideshow thumbnail:<br><img src="{video_preview}"><br>Click on the attached video to view a slideshow</p>
or
<p><strong>Your photos taken with Breeze Booth at {eventName}</strong></p>
<p>Print layout:<br><img src="{image}" border="1"></p>
<p>Slideshow thumbnail:<br><img src="{image2}"><br>Click on the attached video to view a slideshow</p>
You can also design responsive HTML emails using online tools such as Bee or MailChimp. Simply paste the HTML into the HTML message text and replace the URLs for the image preview links with the {image} tokens.
Texts
A single text message is used for photo and burst GIF sessions when using the standard sharing settings. When using the advanced sharing settings a different message can be used for photo only, slideshow and burst GIF sessions.
Click on "Text..." to edit the text message when using the standard sharing settings or one of the text buttons when using the advanced sharing option:
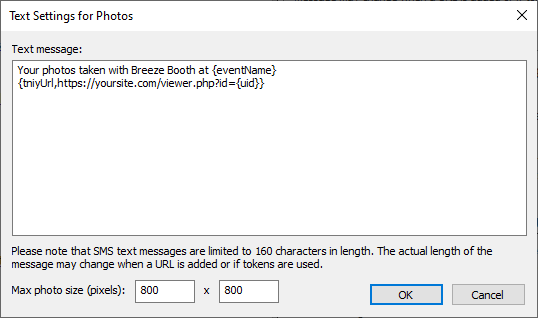
Enter the message text in the "Text message" area. The message text can contain tokens to include information that is evaluated at run time such as the time, event name or information obtained from the survey screens.
Use the "Texting" dropdown list to select the texting method:
1) SMS text message
Sending an SMS text message only sends the message text and does not include the JPEG image, animated GIF or MP4 movie file. The most effective way to use text messages is to send a link to an online gallery or microsite where users can view their photos, animated GIF or MP4 movie using their phone.
2) SMS + image
Send the message as an SMS text message with a link to the JPEG image, animated GIF or MP4 movie file. The JPEG image, animated GIF or MP4 movie file is uploaded from the iPad to Breeze Systems' website where it given an anonymised name to protect guests' privacy. The image will only be available for viewing for 7 days after which it is deleted automatically. Use the {url} token to include the URL to the image in the text message. Use {tinyUrl,{url}} to shorten the URL in the text message.
If the {url} token is not included in the message the URL will be appended to the end of the message.
3) MMS
MMS messages can be sent in the US and Canada using Twilio (www.twilio.com). In other countries the message can be sent as an SMS message with a link to the photo. Most cellphones should recognize the link as a link to a web server and open a web browser on the user's cellphone to view the photo. Please note that the image link in an SMS will only be valid for 7 days.
The {uid} token provides a convenient way of linking to a a microsite while maintaining privacy by using an 8 character id to identify the photos. This can be done by adding the {uid} token to the download filenames in the General Settings so that the filenames of the photos, GIFs and MP4 movies contain the id. The id can then be included in a URL in the message text so that the microsite can display the correct image e.g. the when the photos are taken a unique id is generated such as DEGUQ964 which is added to the filename and the {uid} token in the message text, https:://yoursite.com/viewer.php?id={uid}, is replaced with https:://yoursite.com/viewer.php?id=DEGUQ964
The token {tinyUrl,URL} can be used to shorten long URLs using the free http://tinyurl.com service.
AirDrop
AirDrop is available for sharing photos, animated GIFs or MP4 movie files directly with a user's iPhone or iPad. To enable AirDrop simply add a touchscreen action for "stillsShareAirDrop" or "gifShareAirDrop" to the sharing screens. When the user taps on the AirDrop touchscreen action in the sharing screen the app will display the standard iOS sharing screen with all the standard sharing options apart from AirDrop hidden. iOS allows applications to define sharing extensions and these may also appear in the sharing screen. Apple do not allow an application to hide these sharing extensions and the only way to remove them is to delete the associated apps from the iPad.
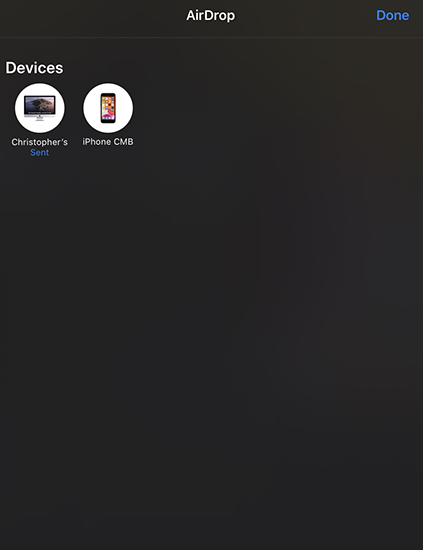
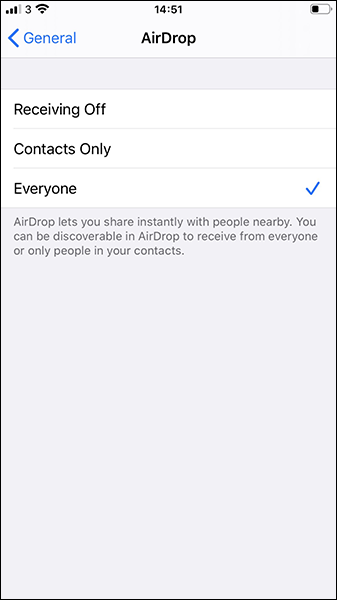
Users need to enable AirDrop for everyone on their iPhone or iPad in order to receive files from the photo booth via AirDrop. To do this they need to tap the Settings app and then select General->AirDrop:
Other Options
Photos taken in stills photo booth mode can be used to create a JPEG print layout with an optional slideshow GIF or MP4 movie. Use the "Show slideshow first in sharing screen" if you wish to share the slideshow GIF. The touchscreen actions "stillsShareShowSlideshow" and "stillsShareShowPrintLayout" can be used to switch between sharing the print layout or the slideshow.
Use the "Share slideshow GIF if available (else share MP4 video)" if you would like the animated GIF to be emailed when both an animated GIF and a MP4 movie have been created.
Select "Share videos" to share videos. Then click on "Video email..." to edit the email message text or click on "Video text" to edit the text message text. The email and text message text works in the same way as the email and text message text for photos and slideshow GIFs described above.
Select "Share GIFs/MP4 movies" to share burst GIFs or the MP4 movies. Then click on "GIF email..." or "MP4 email..." to edit the email message text or click on "GIF text" or "MP4 text" to edit the text message text. The email and text message text works in the same way as the email and text message text for photos and slideshow GIFs described above.
Use the "From email address" to specify the "From" email address when sending emails. This can be a simple email address such as "sales@breezesys.com" or it can also include a name such as "Breeze Systems Sales <sales@breezesys.com>".
For additional privacy select the "Encrypt email addresses and phone numbers for privacy" option. This will encrypt email addresses and phone numbers when they are stored in the XML email and text files and the journal files so that they can't be read. An encrypted address or phone number is decrypted when sending the email or text but is always encrypted when it is saved to file. There is no option to display the decrypted email address or phone number in the Breeze Booth for iPad app or in the Event Editor or in Breeze Hub's reporting tools.
Select "Payment mode" to enable payment mode when sharing photos by email or text from the sharing screens and the gallery. When payment mode is selected and the user selects email or text and has entered their email address or phone number using the touchscreen keyboard the payment screen will be displayed until a payment is made or the payment is cancelled or the payment timeout occurs.
Please see the "Payment Systems" section for more information about accepting payments.
Select "Close sharing screen after sending email or text" if you want the photo booth to return to the ready screen ready for the next session after sending an email or text. If "Close sharing screen after sending email or text" is not selected the sharing screen is displayed after sending an email or text allowing users to send another email or text.
Select "Display QR code in sharing screens" to display optional QR code in the sharing screens. Enter the text that is stored in the QR code in the text edit area. The QR code text can include tokens for dynamically created QR codes e.g. if you have an online gallery or microsite which can display the guest's photos using a UID the QR text could be set to something like https://mygallery.com/view.php?id={uid}
Set the "Sharing screen timeout" to the timeout in seconds before the sharing screen is closed automatically if there is no input from the guests.
The "Sending screen display time" specifies how long the sending_email.jpg or sending_text.jpg screens are displayed when sending emails or texts using a separate PC based utility such as Breeze Hub or when using the SMTP email or Twilio texting options. This provides visual confirmation to the user that the message is being sent.
Saving and Loading Settings
Click on the "Save..." button to save all the sharing settings to file so that they can be copied into other events.
Click on the "Load..." button to load sharing settings from file. The sharing settings can be loaded from a previously saved sharing settings file (saved by pressing the "Save..." button or from the settings.xml file from another event.